Player configuration and status monitoring is accomplished using a Dashboard interface. The Dashboard is available from any web browser, on default port 23233 of the Localhost IP address. For access to the Dashboard from outside the local area network, contact your network administrator to setup port forwarding on your router.
The Admin user can change configuration settings of the Player as required for activation in a broadcast setting as a standalone player. OBPlayer can also be managed by a OBServere reviewed Quick Start.
Be sure to Save any changes on each Page, waiting for a green confirmation message then restarting with the Quit button to take effect. If audio or video hardware modes are changed, a reboot is recommended.
Dashboard access is for first time setup and advance troubleshooting. Once the Player is setup and configured it is typically entirely command and controlled from a managing OBServer.
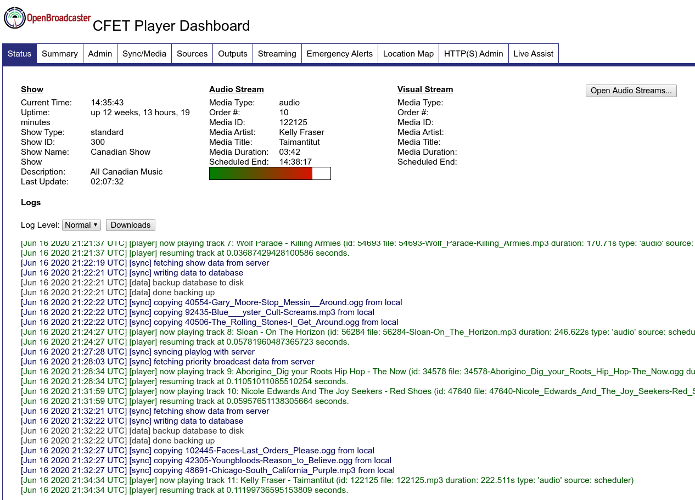
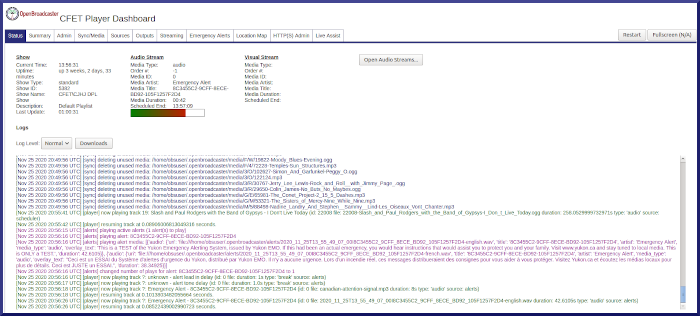
Displays real time information for the current state of the Player. If audio signal is present, a signal level indicator will respond to output from both audio channels. All system operations are displayed on a real time Log displayed on the __Status Page.
Provides detailed logging by viewing the Debug log. The Debug log displays all CAP alert messages received by the Alert Player, before local filters have been applied. The status log will indicate status of connections to the NAAD server(s); only those alerts matching the SGC filters will actually be played
Log Colours
Status Logs Text\CSV
Daily Playlogs
Daily Alerts Log
Audio Logs MP3
On Board Audio Logs
Off-air Audio Logs
SDR Audio logs
Mount points generated for Icecast monitoring enabled in the dashboard.
Main Mount Point
STL Mount Point
Off-Air SDR
Live OverRide
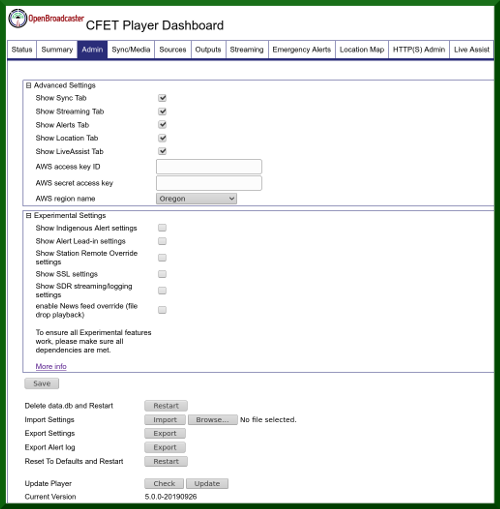
Admin Menu is visible to the Admin user only.
Delete DB and Restore deletes the Player DB that contains schedules. Deleting this and restart forces a sync for new media and schedules. This doesn’t delete the settings of player.
Export or Import settings to save or restore the configuration, if necessary. To create a backup of the configuration export the settings. To restore a configuration, import the settings file. Configuration settings are output in plain text form, excluding passwords. This file should be kept in a secure location. Preconfigured installations may be deployed using settings files.
Settings file and passwords Passwords will not be exported or revealed. Restoring the settings file will reset the player dashboard passwords to default (admin) retaining the created user account. Once the player has been restored, simply login with the user and default password and change in the Admin page to your desired password.
Reset to Defaults will restore the default configuration. Current configuration parameters will be overwritten, but may be restored from the backup settings file.
Update Player allows the user to confirm the installed Player version, check for updates to the Player software, and if desired, retrieve and install the updates. Changes will not take effect until the Player is restarted.
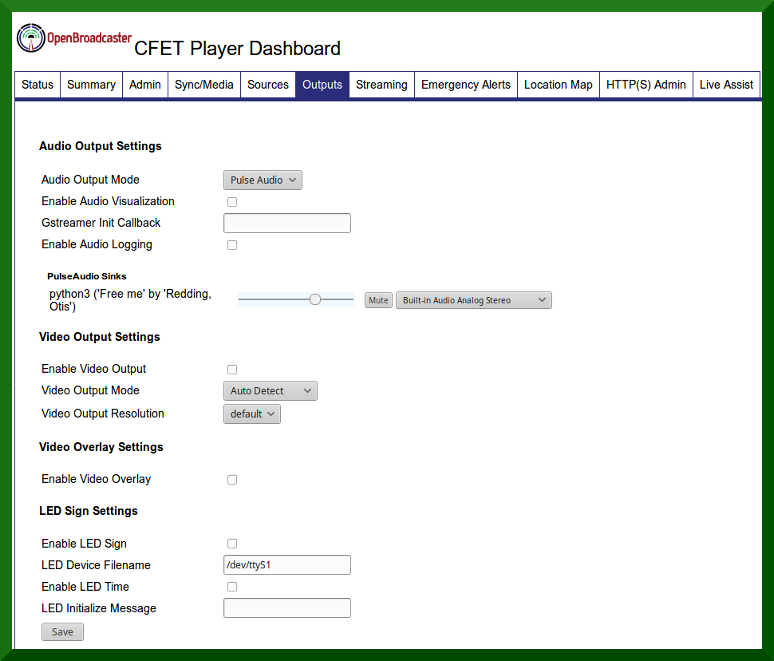
Audio Output Settings modes available to Select:
Enable Audio Logging records one hour files available via Admin>Downloads
Video Output Settings Enables Output Mode
Video Overlay Settings Enables crawl of Alert messages across display
LED Sign Settings Configures serial LED signage
Enable Test Signal Turns on/off the 440Hz test signal
Video output Resolution is automatically detected and displays values when video mode is enabled after restart.
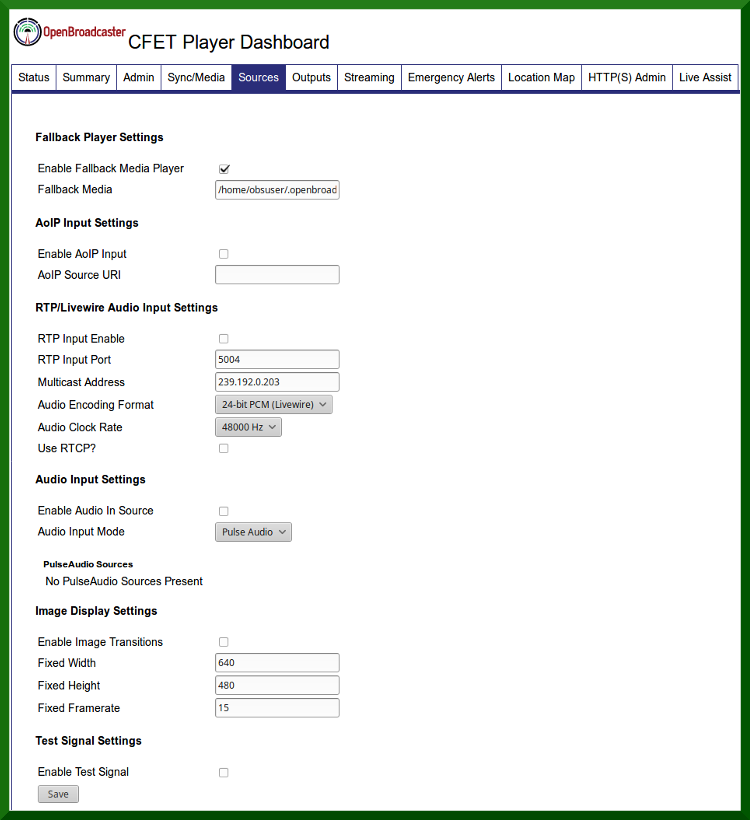
Fallback Player Settings Enables and specifies file location of Fall Back Media. Fallback media directory and sub directory items are played at random, but all items will be played before any media items are played a second time. Default is 15 Seconds for image display.
AoIP Input Settings to specify AoIP Source URI
RTP/Livewire Audio Input Settings sets values for: RTP Input, RTP Input Port and Multicast Address
Select Audio Encoding Format: OPUS, 16-bit PCM or 24-bit PCM (Livewire)
Audio Clock Rate 48000 Hz or 41000 Hz
Enable RTCP Real-time Transport Control Protocol
Enable Audio Input Settings External Sources and enables pass-thru and capture of Line-In
Audio Input Mode
Disable When Silence Is Detected
Prioritize Above Scheduler When source is detected on Lin In, to play that.
.
Silence/Signal Threshold (dB) When to trigger switch over for detecting line in
Time Before Enabling Input and Disabling Input(s) Time Before Enabling\ Disabling Input (s) after it detects silence before it enables\disables the input.
Enable Audio Input Logging Records one hour segments into ./openbroadcaster and accessible via Admin>Downloads
Image Display Settings Slideshow display of image media and overlay
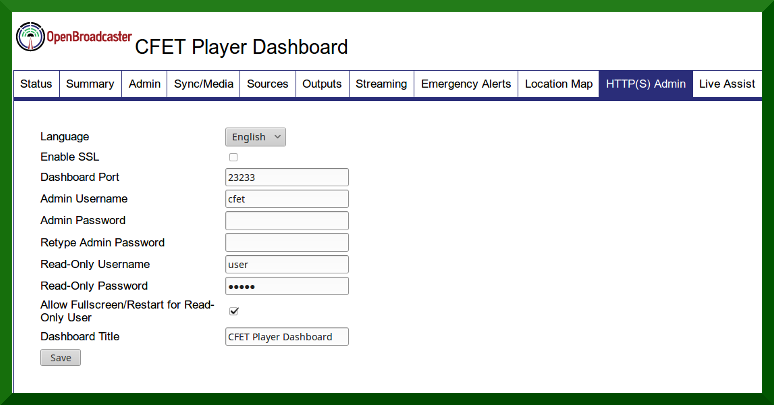
Set Global language
Change Admin user password
Set up Read only user and password
Allow read only user to access restarting through dashboard
Set Text to display in browser Tab and Bookmarks Shortcut
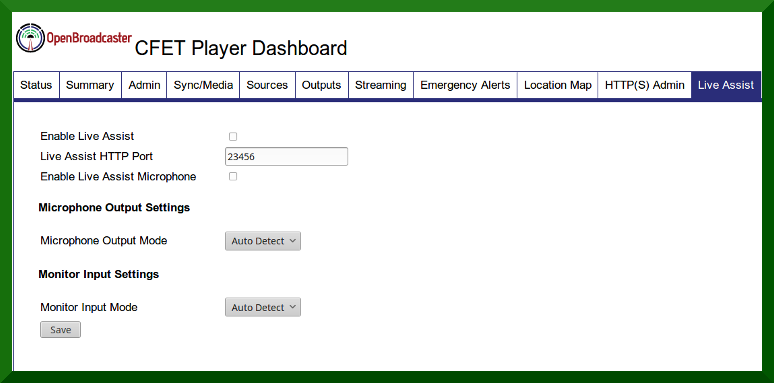
Enable Live Assist
Set HTTP(s) port (Default = 23456) to enable interactive touch screen interface
Specifying Microphone and Monitor sources
More info on using LIVE Assist Here
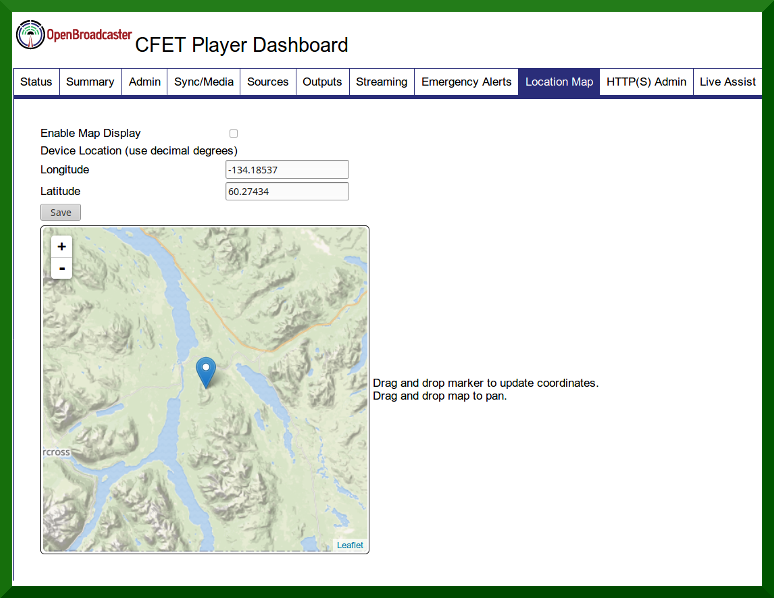
Establishes geographic coordinates for an installation. Coordinates are reported back to an OpenBroadcaster Server, if Sync is enabled to display players and status on a geo map using the Geo Mapping Module.
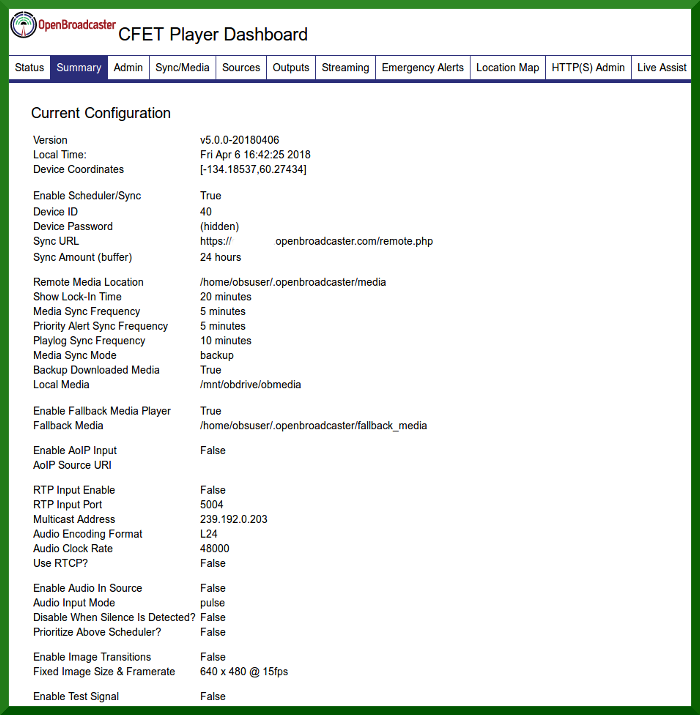
Displays all current configuration settings and additional info; Current Version\Branch, GPS Coordinates and Local Time.
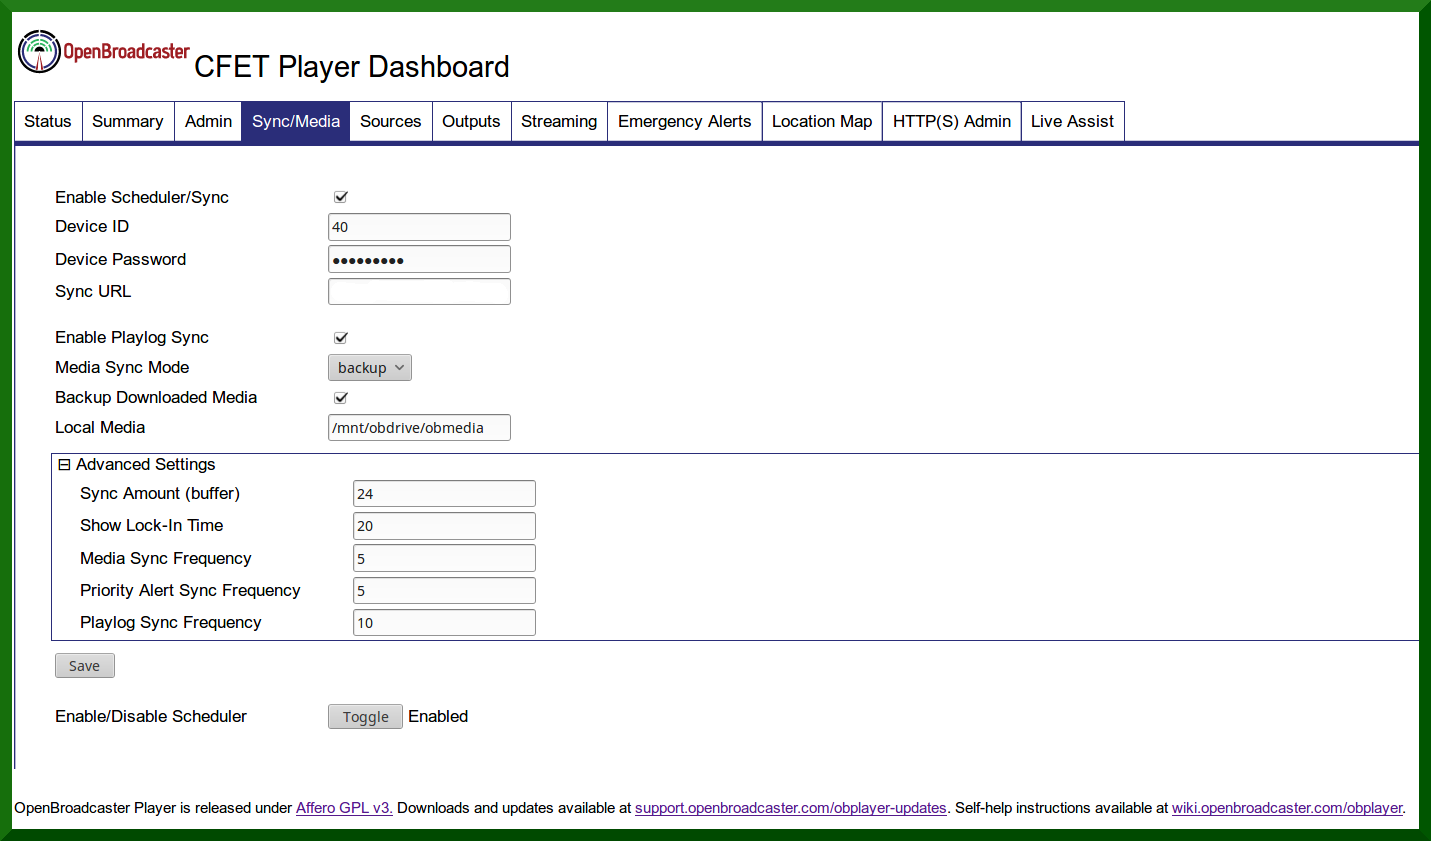
Sync URL should be in the format http://server_ip_address/remote.php or https://server_ip_address/remote.php Device ID and Password should match what was entered in server to provision player. These settings are ignored if Sync/Media settings are disabled such as configured for standalone alerting operation
Media Sync Mode
• Remote stores media under ./openbroadcaster
• Backup stores media locally or shared in a specified directory
• Local is used to access media library that is on the same machine as player
Backup Downloaded Media saves and caches a copy so it doesn’t get downloaded reducing bandwidth.
Maintenace Mode toggles the scheduled material and puts player into lockdown mode with Fall Back Media to set audio levels.
Disables the scheduler’s request queue, so the core player loop will ignore any requests from the scheduler. The next highest priority request generator will take over. If a higher priority request comes in from the alert module, it will play the alert request. The feature will only affect the scheduled content. It’s not quite the same as disabling the scheduler module, since it will still sync media and attempt to schedule content, but it will be ignored by the core player as if the scheduler module was disabled.

Main streaming mount point
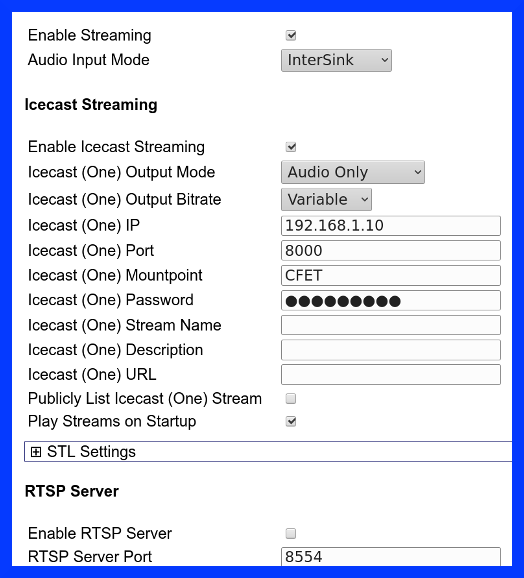
Streaming of player output (audio and video) using Icecast
Audio Input Mode
Intersink - Bypass processing and sends the source material direct to Icecast server
Pulse Audio - Use this mode if you wish to fine tune input and output levels
Alsa
Jack
OSS
No Input
Allows creating a separate feed at a different quality to be sent to a STL. ie Stream 1 sends to outside relay server at 128 KB while the STL Stream 2 sends to transmitter at 320K on internal network.
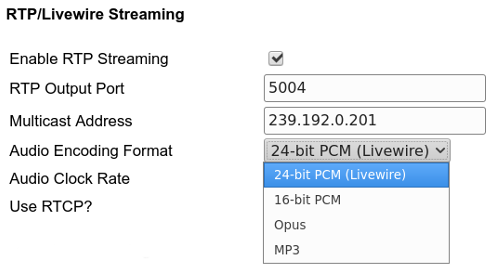
Send and receive AoIP to RTP devices and AXIA Digital Consoles.
Enable RTP Streaming
Specify the multicast address
Select Encoding Format; 24-bit PCM Livewire, 16-bit PCM, Opus and Mp3
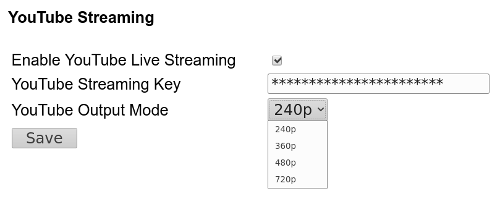
Create LIVE YouTube channel
Enable YouTube streaming
Enter your secret YouTube key to authenticate
Output Mode supports encoding rates 240p - 720p
Restart player and begin streaming!
Emergency messages issued from NAAD (Pelmorex) may be issued as a string of text, digital audio file and/or with an included graphic image. These will automatically be received and broadcast with our systems. In the event the attached alert is missing or corrupted, relayed from Environment Canada or issued using a text source, your system will play the audio using built in TTS(text-to-speech). For video installations it will also display a scroll along bottom of screen and/or a full screen red slide with descriptive text and accompanying audio alerts.
Alert messages will continue to broadcast at the Alert Repeat Interval until the Alert expiry time is reached or when the NAAD sends a command to terminate playing of message. Broadcast Intrusive alert messages are required to play at least once. To limit the number of repeats of an Alert message, it is possible to change this setting.
Please refer to the National Public Alerting System Common Look and Feel Guidance Ver 2 for more detail on specifications and recommended practices relating to public alerts.
Pelmorex sends out keep alive heart beats that our player monitors to ensure connectivity to receive alerts. A stable internet connection must be available to receive heart beats and CAP alert messages.
Pro Tip In the Admin menu set Log Level to only show heart beats and alerts.
In Canada, a Standard Geographical Classification uses a numeric code to identify discrete areas, based on census districts. Alerts will be filtered to include only those that match, contain, or are contained by the set Alerting District.
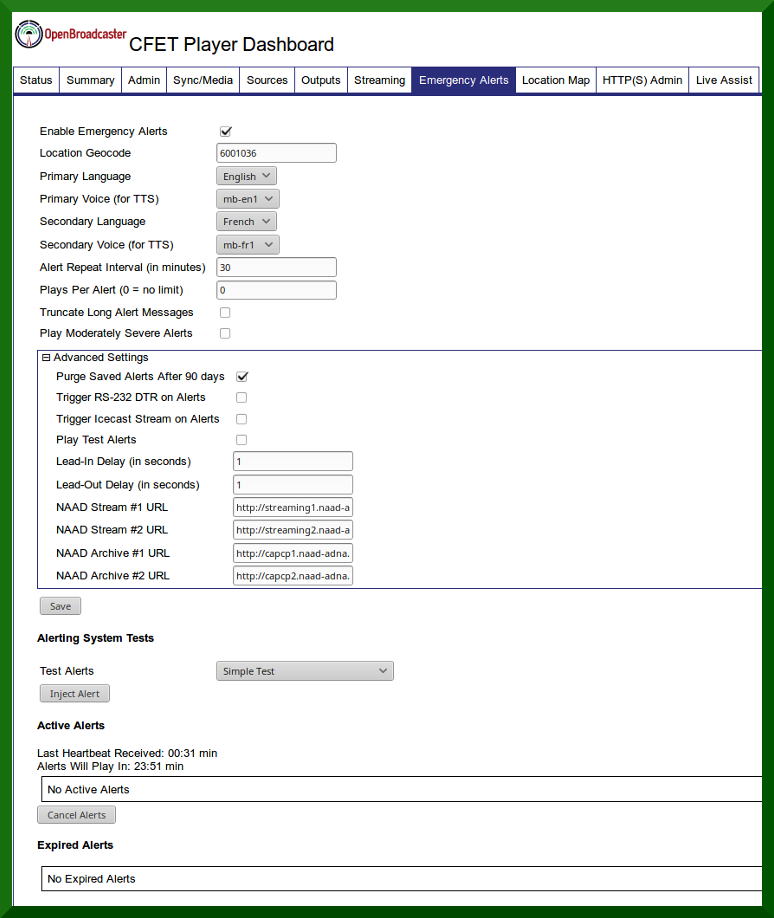
Emergency alerting dashboard is built into OBPlayer and configured in the dash board Emergency Alerts.
For initial setup, disconnect any USB audio device before powering up the unit, and use the internal green speaker/headphone jack to monitor audio output for testing. Do not setup and provision unit on air in a production environment until it is understood how it works.
Open the Dashboard to configure and ensure Emergency Alerts are enabled
A single SGC Geocode is required for your alerting locale. In the Location Geocode window, simply enter your region’s name and a current list with the SGC code will display. Multiple region SGC geocodes may be used and separated by commas eg: “6001036,6001018” would play alerts for both Tagish AND Haines Junction. Entering “6001” would capture both districts, as well as any others in the immediate locale.
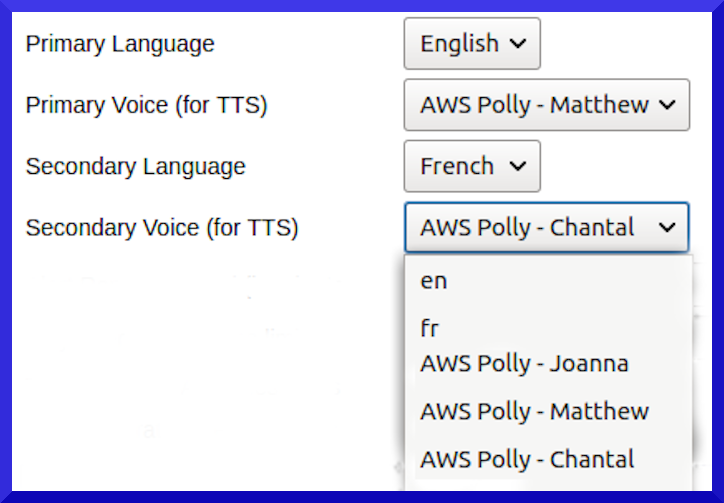
Select and configure Primary and Secondary Language options.
Onboard TTS - Mediocre quality at best (recommended to change on first setup)
ESpeak Mbrola Voices - Not much better quality as above, but an improvement. Select Language i.e. English then associate MB-en1 as primary language voice. Select French and primary voice of MB-fr1
Best possible solution for TTS. Sounds very natural. Configured and enabled, when a valid CAP message is recieved, the text of this message is sent to AWS and produced as an mp3 file, sent back for airplay.
1) Select Enable AWS POLLY enter the API key into the advanced menu in Admin. Restart player.
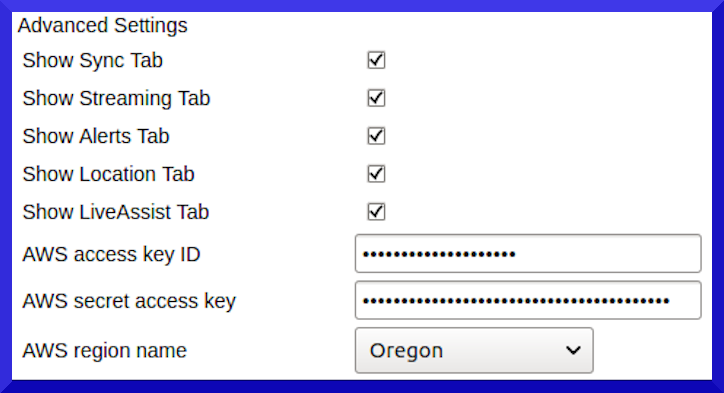
2) Emergency Tabnow displays a selection of bilingual male and female voices to choose from: Joanna, Matthew and Chantal (more to come)
You’ll need an API key from Amazon Web Services (AWS) using a free plan. If running a large network of POLLY devices, there is a very small fee to use this service, approx 4.00 USD for one million characters for thousands of hours of spoken word.
Register at AWS POLLY
Go to Identity and Access Management (IAM)
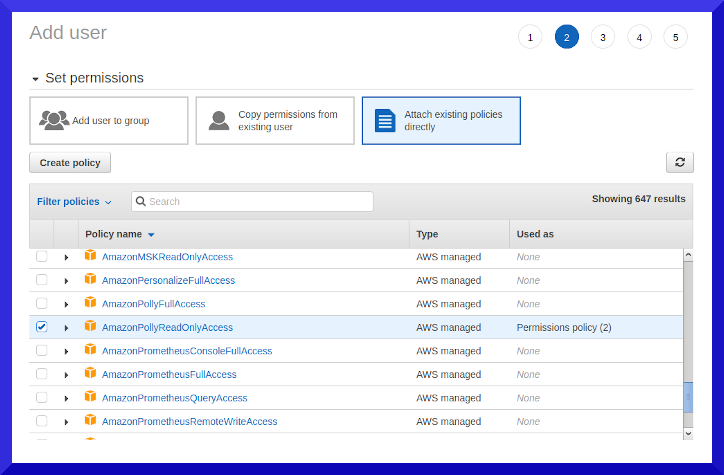
Create User with Access type = Programmatic access
Attach existing policies directly by scrolling through list and selecting with a check box AmazonPollyReadOnlyAccess
Add POLLY policy to user
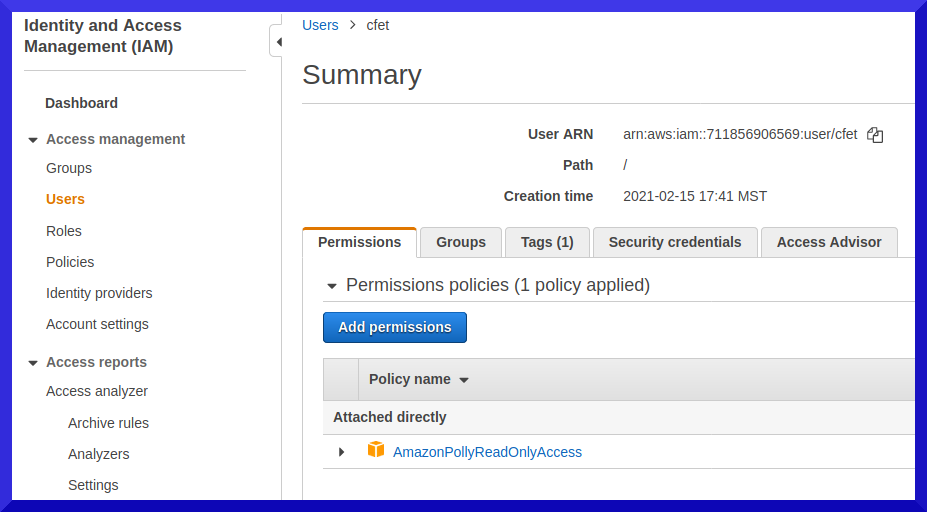
View POLLY service attached to user
View API Key. It has 3 parts
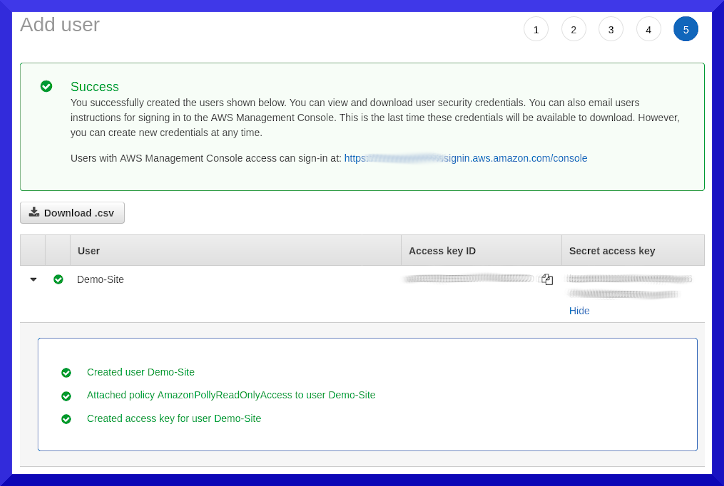
Export User Key
After creating user and attaching policy you will be able to generate the Key. A single use menu will appear allowing you to copy and paste the keys and/or download link a small csv file with credentials for backup. Download this file and stash securely. If AWS key is lost or cannot remember, simply generate a new one
AWS Region should be set to the data centre closest to player.
Once you enter the key and enable Polly, restarting player will populate the alerting voices with available voices.
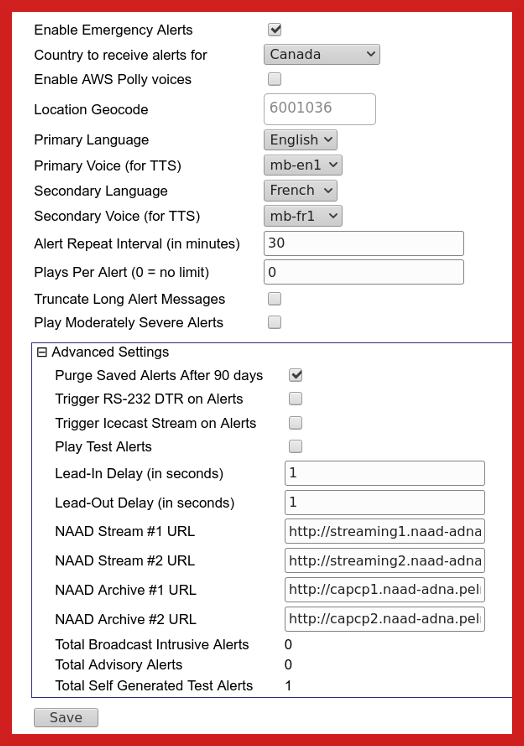
Adjust the Alert Repeat Interval time between repeated plays of queued alert messages. Setting this value to 0 will cause an alert message to play until the Expiry time stated within that message has passed
Use the Play Moderately Severe Alerts setting to enable optional, non-broadcast intrusive alert messages, if desired. Provides a setting to Truncate Long Alert Messages to shorten long alert messages to include only the first section To play the entire CAP alert, including the entire lengthy description, disable the Truncate Long Alert Messages setting .
Provides an override to Play Moderately Severe Alerts that do not have a Broadcast Immediate status
Trigger Icecast Stream on Alerts creates an on demand mountpoint
Lead in/Out times used with a streaming service to allow entire message to not get cut off while buffering
Play Test Alerts These are not scheduled test of the alert systems, but internal system test not normally heard by public (Default = Off) Note: These alerts are not related to scheduled tests from Pelmorex.
Purge Saved Alerts after 90 days will free up your disk space, even more of a concern now with the large multimedia attachments being sent along with the CAP message.
GPIO Trigger to issue a DTR serial signal upon commencement of CAP-CP Alerts. When an alert cycle starts, the serial port will be opened and the DTR control signal (positive pin voltage) will be transmitted. After the alert cycle has completed, the DTR signal will drop (negative pin voltage).
Lead-in and Lead-out delay timings may be adjusted to prevent ‘clipping’ of messages.
Trigger Icecast Alerts is used to generate an on demand Icecast mountpoint.
Logging of Alerts shows the count of played alerts; broadcast intrusive, moderate advisories and self generated tests. This can also be downloaded from the Admin main menu.
Every station is setup different with several ways to inject audio and visual alerts into the broadcast chain. CAP alerts are received and authenticated by the standalone alert player and put into the broadcast chain each with their own merits, listed below in no particular order.
When an alert is received, audio is sent out for your systems to receive in several ways. Generally there is no audio present unless a message is being issued; either a valid CAP message, Pelmorex test message or when a internal test alert is issued.
• Onboard analog stereo 1/8” mini output using Realtek ALC888S codec. Audio present only when a valid CAP message is being broadcast.
• GPIO trigger reverses DTR voltage on pin 4 using RS232 DB9 when CAP message is played to switch an External relay.
• Using BARIX exstreamer at transmitter to listen to a priority port of incoming stream of CAP message
• Configuring ICECAST server to detect new mount point of on demand stream
• Silence Detection using external third party hardware used to sense audio coming out of the Alert Player and mechanically switch a relay on your board.
• Windows playout machine may use free Silence Detection software from Pira CZ Silence Detector to switch broadcast audio source when CAP message is played.
• Integrating to AXIA Digital AOIP Consoles to sense an on demand Livewire stream of CAP message in conjunction with the Qor’s GPIO to switch channels on the console while EAS is in progress and switch back.
OBPlayer creates an on demand IceCast mount point when an alert is present with a Barix Exstreamer receiver at transmitter to play CAP alerts. Stations normally will be supplying audio to Exstreamer at transmitter. Barix will be configured to detect and automatically switch to the generated alert mount point the new mount point stream, cut over and play alert, switch back to normal programming when alert stops.
Prerequisites
In order to make the priority streaming work, so that OBPlayer only outputs the alerts and nothing else; disable the scheduler, fallback player, audio in, and the test signal.
Configure OBPlayer
Streaming Page Create a mount point on local machine’s IceCast server. Exstreamer will switch to the generated alert mount point and switch back when it stops. There is a minor delay in the switching with Barix Exstreamer. Set the lead-in delay to 1 second and the lead-out delay to 5 seconds to catch the whole alert cycle without having too much delay before and after.
Barix Configuration Set the first URL as priority for the alert stream. Second URL is set to the normal stream coming from the studio.
When a CAP message matches your region, a mount point will be temporarily created, overriding your studio. When the alert is finished playing, normal programming from your studio will resume.
If using the GPIO switching Relay, connect a serial cable from the Player to the Switching Relay. On the Emergency Alerts tab, under Advanced Settings, enable the RS-232 DTR Alert signal.
Applicable for; over the air TV, Cable TV and digital signage applications. Normal visual content will be displayed. When there is a valid CAP alert, a red scrolling overlay will display the text of message with accompanying audio of the alert. Graphis sent as attachments will display full screen if present.
• Onboard local video with (HDMI\DP\DSUB) where an overlay will be displayed when a valid CAP message is being broadcast.
• GPIO trigger on pin 4 (high) using RS232 DB9 when CAP message is played to switch CATV channel on digital cable head end.
• Configuring ICECAST server to detect new mount point of on demand stream of CAP Alert
We offer several ways to test and set levels.
To confirm that Alert messages are working correctly, select one of the four sample valid CAP messages:
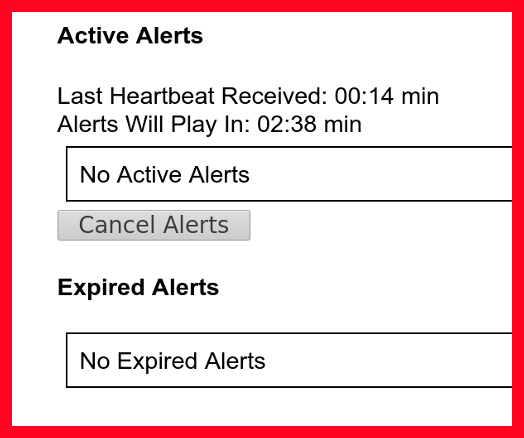
Inject to add the message to the Active Alerts queue; a 20 second countdown begins. If another incoming message is received, the countdown timer is rest at 20 seconds. Once the countdown reaches 0 secs, queued messages will play through the active audio output and can be observed in real time on the player’s main Status Page displaying the current state of the Player with live display of system events.Pro Tip Try different text-to-speech voices when testing alerts, before placing on air.
In Canada, national tests are done every 6 months. Contact Alert Ready for more info on scheduled testing.

It is possible to monitor and receive real alerts by entering high level SGC geocodes for provinces (Atlantic Canada=1; Quebec=2; Ontario=3; Prairies=4; British Columbia=5; Northern Canada=6) and test with moderate advisories.
Enable the Play Moderately Severe Alerts setting to receive and play additional warning messages.
Set your levels, testing and be sure to reset the Location Geocode back for your specific alerting locale before proceeding to Production Operation.
Pro Tip ` Admin` Menu has a button to export a text log of all Broadcast Intrusive messages ever played on your alert player
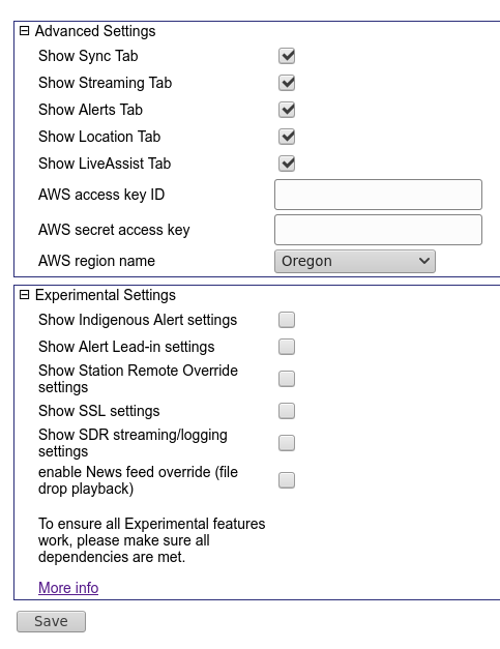
Use these at your own risk for experimenting with of new features that are not recommended for production environments. Enable the feature from Admin advanced menu and restart player. More info about experimental features is found Here
Find a bug? Want to request a feature? Submit your issue to OBServer or OBPlayer
Have some Gstreamer, PHP or Python coding skills? Help Contribute and Sponsor to make the OpenBroadcaster community even better
We really appreciate your feedback!