New process for updates with CLI Tool >5.3
After install, run CLI Tool, change passwd for admin
obsuser@observer:/var/www/observer$ tools/cli/ob
OpenBroadcaster CLI Tool (alpha) Run ob <command>

Commands:
check                 check installation for errors
cron run              run scheduled tasks
updates list          list available updates
updates run           run available updates
passwd <username>     change password for user
Use CLI tool
/var/www/observer/tools/cli/ob passwd <username>
Legacy Updates pre 5.3
After install, log in as user updates privileges and Run updates with GUI tool.
http://Your_Server_IP/updates
Fix for OB Sites in config by adding a FQDN (Fully Qualified Domain Name)
nano /etc/hosts
“This file format is not supported” and “Cannot upload media”
Make sure format is enabled >Admin>Media Settings
    ln -s /usr/bin/ffmpeg /usr/local/bin/avconv

    ln -s /usr/bin/ffprobe /usr/local/bin/avprobe
Open local Terminal or ssh into target machine. Cd to dir where player files are installed eg /usr/share/obplayer
Do not run as root or Sudo
Script bash obplayer_check starts the player and checks for existing instances and not start if already running
Script bash obplayer_loop runs in an infinite loop to restart in case it unexpectedly terminates (crashes) or is shutdown via the web dashboard
Add these switches for extra functionality
obplayer -d Prints log messages to stdout console
obplayer -f or --fullscreen Starts GTK full screen on startup
obplayer -H Starts headless, no desktop GUI (audio only)
obplayer -m Starts screen minimized
obplayer -r Restart. Clears out media & broadcast cache
obplayer -- disable-updater Disables the OS updater
obplayer -- disable-http Disables the http admin dashboard
obplayer -c CONFIGDIR, --configdir Specifies an alternate data directory
Default directory ‘~/.openbroadcaster’
On headless machines OBPlayer is accessed from a web dasboard accessible from another machine on the same network from an IP address that is issued with DHCP. To determine the local IP of Player from terminal issue ip addr show Your IP will appear like 192.168.1.100. 127.0.0.1 is a local loop back IP internal to your machine. You might also get into your router and look at the DHCP Client list and see the players IP that way.
Recomended that OBPlayers be setup with a static IP address as DHCP can often change.
From a web browser type
http://ip-of-server:23233
Login window will prompt for user and password. If there is a timeout and/or network unreachable message try these steps to resolve.
Networking Tests
From Terminal Ping “localhost” replies indicate internal networking working
From Terminal Ping “IP-of_Router/Gateway” replies indicate networking working to router.
From Terminal Ping “IP-of-Other-Device-on-Network” replies indicate OBPlayer and router are able to communicate to other Devices.
From Terminal Ping “google.com” replies indicate network is able to communicate through router to the real world internet.
If you are unable to access the player dashboard, do not have local access or running in a virtual service, you’ll want to verify OBPlayer appears as a process.
From Terminal
ps -ef | grep python
Lists all Python process including OBPlayer. If this is not showing then OBPlayer is not running.

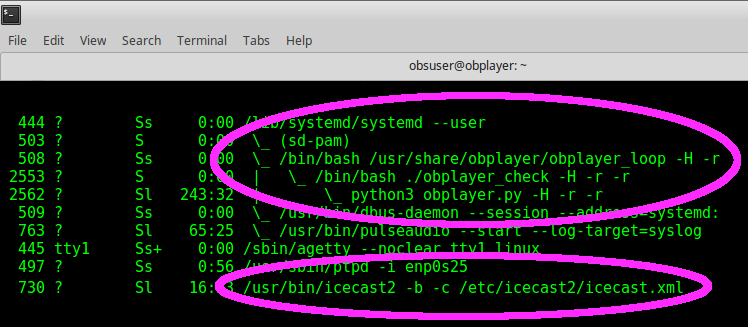
To check all running processes, including OBPlayer and Icecast
ps fax
In this example both OBPlayer and Icecast are highlighted
Ensure OBPlayer device is able to access the internet.
From the local machine, open a Terminal and “ping google.com” to reach the management server as specified in sync settings under the Sync tab.
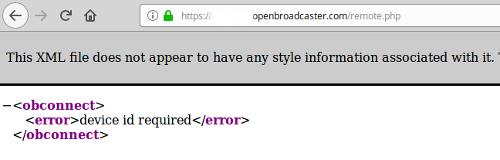
The format of the sync url can be “localhost/remote.php”, “127.0.0.1/remote.php” or http(s)://IP-of-Server/remote.php” Do not forget to include the trailing /remote.php
Check the sync url exisits by pasting into browser and you should see screen asking for Device Id. This isn’t accesible or do anything, but you can verify the server is expecting a sync for that ID
Confirm/Re-enter passwords and Device to match player in >Player Manager in the OBServer
From >Admin Tab Restart DB and Reset forces a reset of a fresh sync of media and schedules
Files containing user and machine settings are located in the hidden Default directory ‘~/.openbroadcaster’ folder within the users home directory. Admin Tab provides utilities for backup and restoration of user settings. To reset admin or lost passwords may be recovered by editing the sqlite DB file settings.db or simply deleting it and restarting OBPlayer. On restart OBPlayer will recreate this DB with default values.
data.db contains a copy of media and schedule for the period identified by the sync buffer (default 24 hours). From OBPlayer dashboard >Admin Delete data.db and Restart to purge db forces a refresh of schedules and media according to the current sync settings. Useful when changing backend services.
Pulse is the default tool for adjustment of output levels for all installed sound cards in Ver 5.X Series OBPlayers and will produce sound quality suitable for broadcast.
Addional supported audio modes:
• ALSA
• Esound
• OSS
• JACK
Set to No Input to disable on board audio play back.
Setting Audio Mode and restarting will bring up a visual slider control to set levels for both input and output in dashboard to control signal levels
Use the test signal to confirm your audio setup is working correctly.
To test the on-board sound card:
To test an external USB sound card with XLR balanced audio output:
If no audio output is produced, check the Status page for errors in the log and observe VU meter for activity:
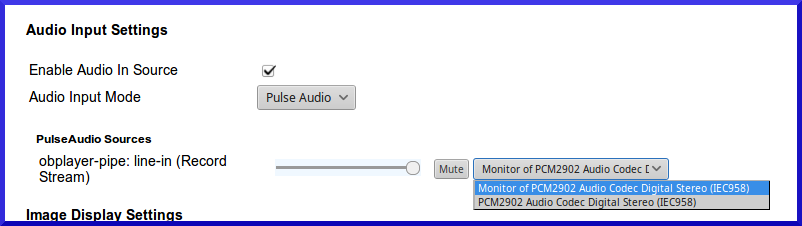
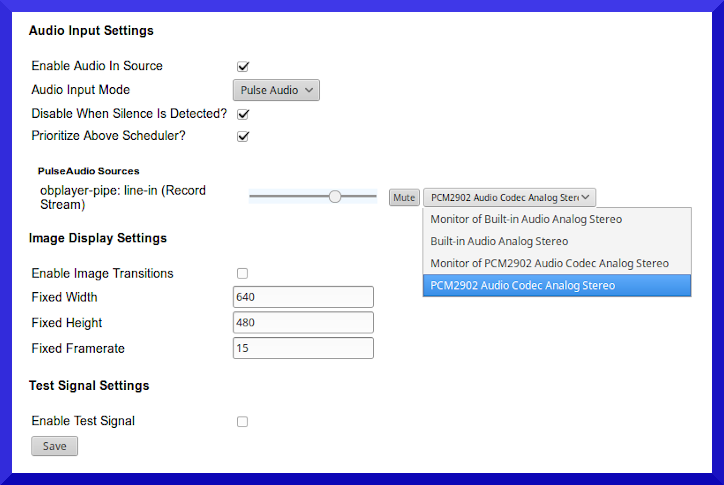
audio mode is properly configured.gstreamer errors indicating problems with audio mode settings.pulsemixerDisable the test signal once audio setup is working. Enable Audio In Source, if necessary.
Pulse is the default and recommended audio system to use with OBPlayer. When audio mode settings are changed, Restart. Once restarted, audio slider controls will be present in the dashboard under PULSE to set input and output levels.
On the Outputs Tab set audio output mode to PULSE. Disable the Test Signal From Sources Tab enable the Audio In Source setting audio mode to “PULSE”.
If using the GPIO switching Relay, connect a serial cable from the Player to the Switching Relay. On the Emergency Alerts tab, under Advanced Settings, enable the RS-232 DTR Alert signal. The RS-232 Device Filename should be set to the serial port (/dev/ttyS0 for Port 1, /dev/ttyS1 for Port 2).
When enabled, will automatically record only if signal present on line in
There are no input level GUI controls “out-of-the-box” with Jack audio, so if further control over the input level is desired, the configuration must be updated to include jack-mixer. Using jack-mixer programs requires a modified jack.plumbing configuration with connections defined between the OpenBroadcaster ports, the jack-mixer control and system output.
~/.jack.plumbing ( or /etc/jack.plumbing) contains the correct connection definitions.~/.pulse/client.conf is set to enable Pulse to autospawn.
Create a new configuration file called .jack.plumbing in the home directory (make sure it has the preceeding dot). This will override the system defaults.obsuser@obsource:~$ `nano ~/.jack.plumbing`
#connect Audio Inputs to OpenBroadcaster Inputs
(connect "system:capture_1" "openbroadcasterin:in_audiosrc_1")
(connect "system:capture_2" "openbroadcasterin:in_audiosrc_2")
#Connect Openbroadcaster Outputs to Audio Outputs
(disconnect "openbroadcasterout:out_audiosink_1" "system:playback_1")
(disconnect "openbroadcasterout:out_audiosink_2" "system:playback_2")
(connect "openbroadcasterout:out_audiosink_1" "jack_mixer:OB_In L")
(connect "openbroadcasterout:out_audiosink_2" "jack_mixer:OB_In R")
(connect "jack_mixer:OB_In Out L" "system:playback_1")
(connect "jack_mixer:OB_In Out R" "system:playback_2")
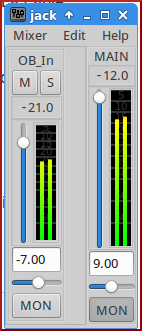
If Jack is already running, it will load the new configuration. Open the jack-mixer this will open a mixer control, with an input channel on the left and Main output channel is on the right. The sliding control for the input channel can be used to set the level for the line-in (input) signal.
If Jack is not running ensure it is configured in the Dashboard, and reboot the Player, and open the jack-mixer control from desktop.
EG When using jack mixer, the jack-mixer control must be opened manually from the Panel Icon to activate the control. Once the control is closed, the output will stop playing. The control must be visible and indicating signal bars for output signal to be audible. The mixer control must be reopened after a reboot, or no sound will be produced.
To open the jack mixer control in headless mode), use the command:
jack_mixer -c ~/.openbroadcaster/init_mix_vol --no-lash.
To restore the original configuration of jack.plumbing, without the jack-mixer control, edit ~/.jack.plumbing file to define the following connections:
   #obsuser@obsource:~$ nano ~/.jack.plumbing

   #connect Audio Inputs to OpenBroadcaster Inputs
   (connect "system:capture_1" "openbroadcasterin:in_audiosrc_1")
   (connect "system:capture_2" "openbroadcasterin:in_audiosrc_2")

   #Connect Openbroadcaster Outputs to Audio Outputs
   (connect "openbroadcasterout:out_audiosink_1" "system:playback_1")
   (connect "openbroadcasterout:out_audiosink_2" "system:playback_2")
Select video system in drop down menu in >Sources>Video Restart OBPlayer dashboard. When the new video system is enabled, it will automatically detect the video capabilities of the onboard detected video processing.
Setup outgoing mail service using exim4 :
Terminal Emulation consolesudo nano /etc/exim4/passwd.client and enter a valid outgoing email account, using the format “target.mail.server.example:login:password”Sample Notification Email
From: noreply@openbroadcaster.com Subject: OpenBroadcaster OBPlayer Warning This is a warning that Player "CALLSIGN XXX.X FM" has not connected for "schedule" in the last hour. Please take steps to ensure this device is functioning properly.
Email notifications of problems
Email Notification Alerts
When a playlog, schedule or media sync hasn’t been received from a remote Player in 60 minutes, an advisory email will be sent to the Admin user address from the server indicating there is a problem that needs attention. There is no interface for configuring it (as long as the cron is being run). You have to add some rows to the ‘notices’ table (phpMyAdmin would make this pretty straightforward). Add rows as follows:
ID: (this is automatic, leave blank) event: device_last_connect_schedule_warning, device_last_connect_playlog_warning, or device_last_connect_emergency_warning.
These are three different event types - the system will look for a failure to connect in the last hour based on these three different requests (schedule, playlog, or emergency data). So you will probably want one row for each.
device_id: the ID of the device you want email notifications for email: the email address where the notifications should be sent to toggled: set to 0; this is what prevents multiple warnings from going out. As soon as there is a failure, this gets set to ‘1’ and an email is sent out. as soon as the system looks to be backup and running, this gets set back to ‘0’ automatically.
The idea here is that there is one email going out per failure. EXAMPLE
INSERT INTO notices (event, device_id, email, toggled) VALUES ('device_last_connect_schedule_warning', 1, 'admin1@dom.com', 0);
INSERT INTO notices (event, device_id, email, toggled) VALUES ('device_last_connect_playlog_warning', 1, 'admin1@dom.com', 0);
INSERT INTO notices (event, device_id, email, toggled) VALUES ('device_last_connect_emergency_warning', 1, 'admin1@dom.com', 0);
INSERT INTO notices (event, device_id, email, toggled) VALUES ('device_last_connect_emergency_warning', 1, 'admin2@dom.com', 0);
To restore the original factory configuration, obtain the disk image for your supported Player/Server from your [OpenBroadcaster Downloads] (https://openbroadcaster.com/store) Contact us for access.
Use Etcher or similar utility to create a bootable USB drive (min. 8Gb) from the disk image.
Insert the USB drive into the OBPlayer, and power up the unit. The imaging process will start auotmatically. A progress bar will display. Be patient at 88% for a few minutes, it really is copying data. Observe activity on USB boot device.
When the process has completed, a window will prompt to power off. Remove the USB drive and reboot.
Find a bug? Want to request a feature? Submit your issue to OBServer or OBPlayer
Have some Gstreamer, PHP or Python coding skills? Help Contribute and Sponsor to make the OpenBroadcaster community even better
We really appreciate your feedback!