
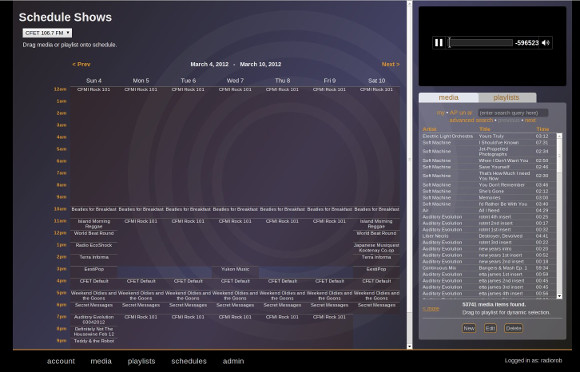
The main screen comprises three areas: a center ‘work’ area, media sidebar, and a menu panel.
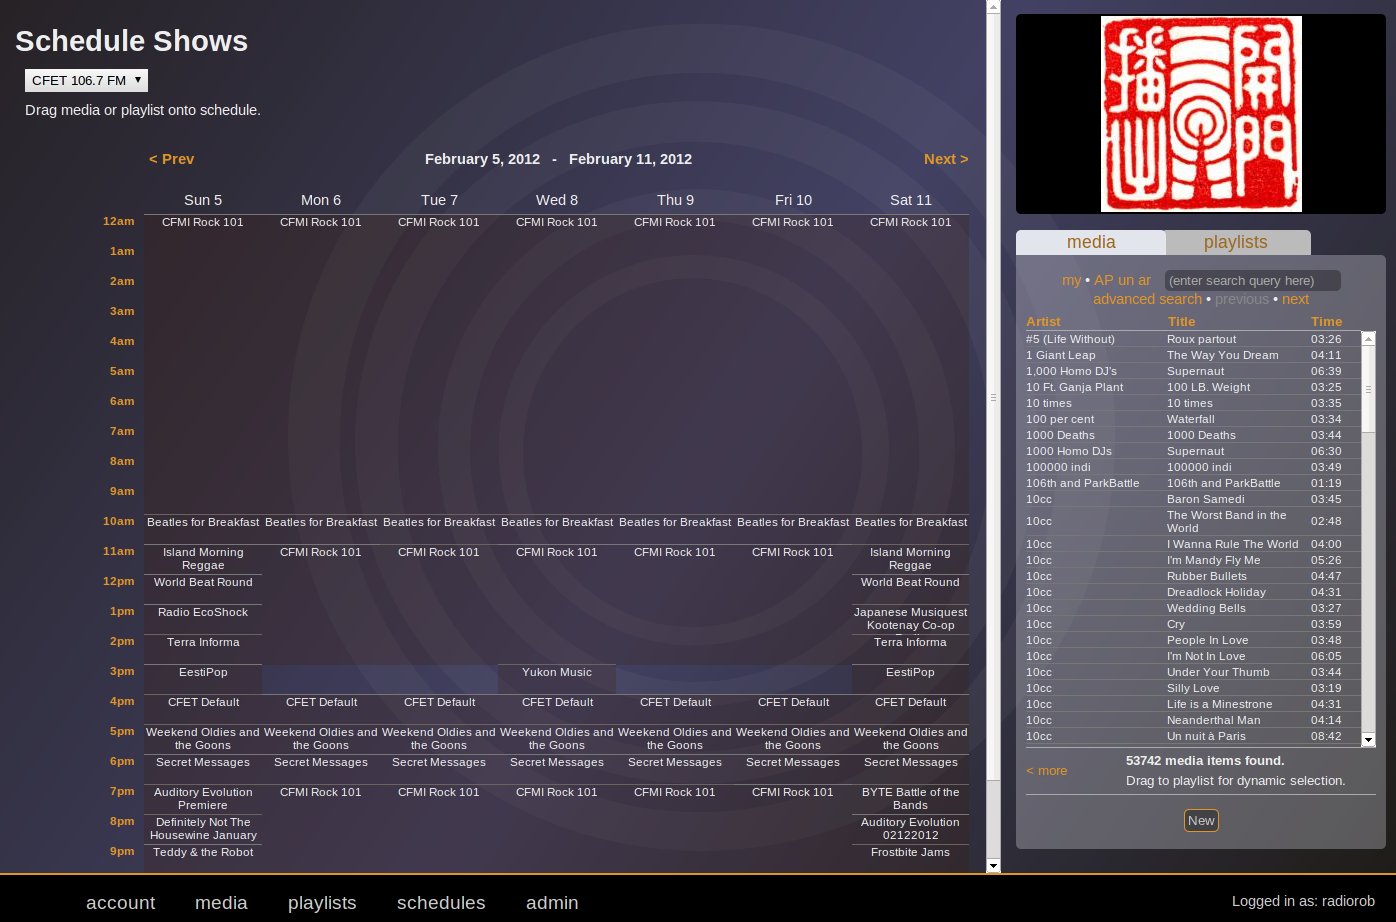
The centre work area is the main window workspace. This is where users can create play lists, add and edit media, schedule shows, update system settings, install modules and manage users. In the example above, a Schedule is loaded into the main window workspace.
To the right of the center ‘work’ area is the sidebar , comprising two tabs, Media and Playlists, as well as a Preview window. Users can toggle between tabs and perform dynamic searches to filter a list of items based on a metadata query. One or more items from the list may be selected. Actions triggered by clicking on buttons below the list operate on selected items. Additional functions are available by right clicking on items in the list. To preview items (any supported media including audio, image or video), simply drag and drop any media into the Preview window above the sidebar tabs. At the bottom of the sidebar, the number of items in the (filtered) list is shown.
Along the bottom of the screen is the menu panel. Depending on user permissions some menus will remain hidden.
Login to the [OpenBroadcaster Server] application as the admin user (default password is ‘admin’)
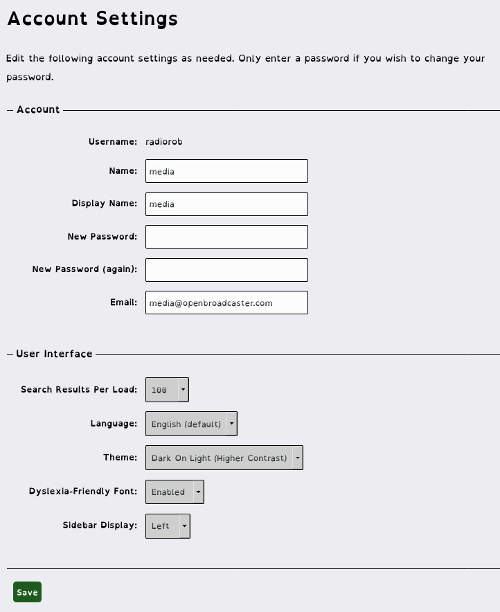
Here you are able to custom tailor your session. Using the account menu to access the admin account settings. Some of the things you can change on a per user basis.
EmailThemeSidebar Displayto appear from Left or RightUser menus, form fields and system messages are displayed in English by default. Available language options are displayed in a dropdown menu. These settings are not system-wide. Each user may choose their own language settings. Select the desired language of menus, help and tool tips.
Save and refresh browser.
Background/foreground color and font options are designed to enhance accessibility of the interface using bright/dark contrast settings or using dyslexia friendly fonts. These settings are not system-wide. Each user may choose their own theme and font settings.
Select desired Themes ranging from high contrast, light\dark backgrounds. Tanzanite is the Default theme.
Save and refresh refresh your browser to take effect.
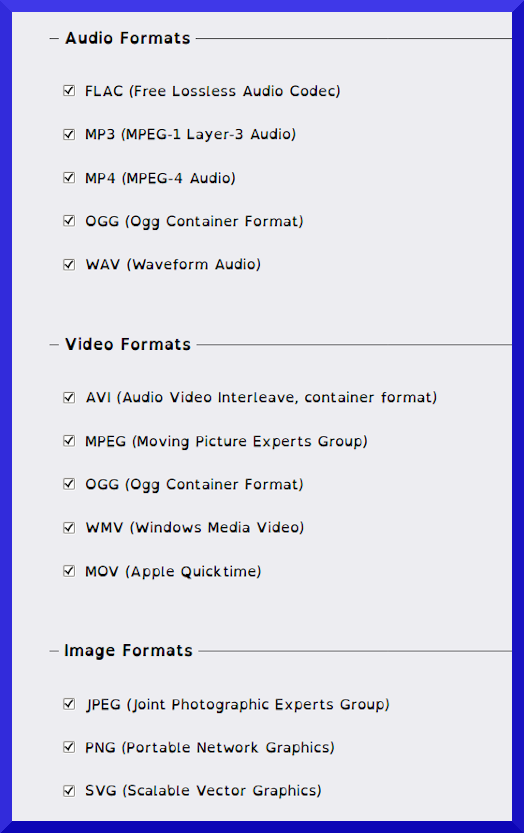
OpenBroadcaster allows media of different types (audio, video, images) to be managed within a single catalogue or media library. Using radio buttons admins can select which formats the system will accept and recognize. If media is tried to be uploaded that isn’t supported, then it will not be allowed to be added to the library. Files are screened a number of ways for authenticity including MD5 checksum. Renaming a text file to *.mp3 will not be accepted.
The MY button when selected filters to only show media created and uploaded by user.
Compatible media codecs and containers are listed below:
| Format | Description | File extension |
|---|---|---|
| Audio Formats | ||
| FLAC | Free lossless audio codec | .flac |
| MP3 | MPEG-1 Layer-3 Audio ☼ | .mp3 |
| MP4 | MPEG-4 Audio ☼ | .mp4 |
| Ogg Vorbis | Ogg Container Format | .ogg |
| WAV | Waveform Audio | .wav |
| Video Formats | ||
| AVI | Audio Video Interleave, Container Format | .avi |
| MOV | Apple Quicktime ☼ | .mov |
| MPEG | Moving Picture Experts Group ☼ | .mpg |
| Ogg Video | Ogg Container Format | .ogv |
| WMV | Windows Media Video ☼ | .wmv |
| Image Formats | ||
| JPEG | Joint Photographic Experts Group | .jpg |
| PNG | Portable Network Graphics | .png |
| SVG | Scalable Vector Graphics | .svg |
☼ Non-Free Proprietary - Licence Required
The System Administrator may choose to restrict uploads to a subset of thepatible formats.
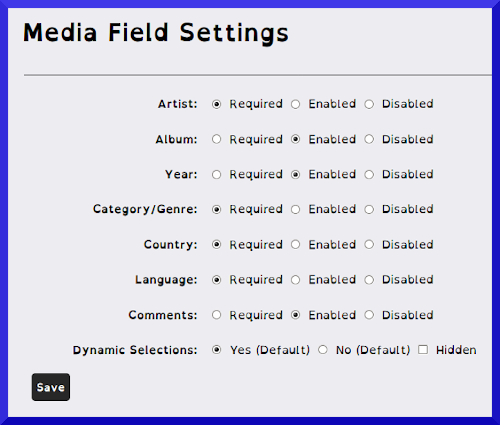
Global default media fields and behaviour.
Complete list of Codecs and Containers
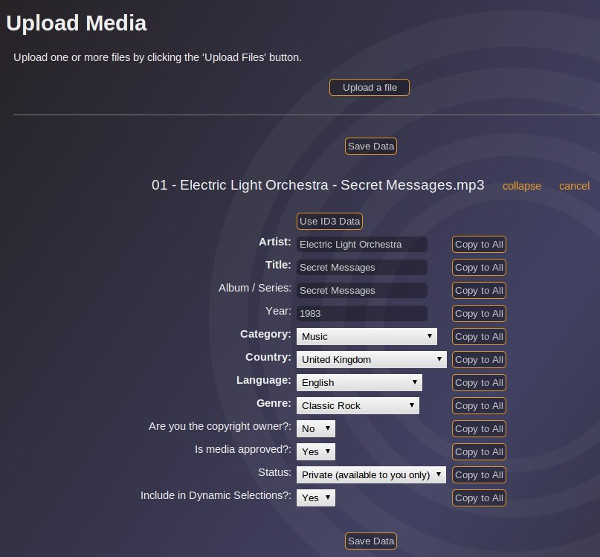
If available, ID3 data are automatically entered into the upload form, otherwise, enter the Artist , Title , along with other known metadata for each file. For metadatamon to all items, the Copy to All button may be used to facilitate data entry. Use the Category item to facilitate use of Station ID or Priority Broadcasts messages in Playlists.
Depending on permissions, user may or may not be able to set the is media approved flag. If not then the media will remain in an ‘awaiting approval’ queue until the Moderator approves it for inclusion in the music library. A Status of ‘Public’ will allow others to include the selection in their own Playlists. Private media will not be available for other users to browse. Dynamic Selection should be enabled for media such as music and station IDs, so that these items are accessible as Dynamic Playlist selections.
Once metadata have been entered, Save the items in the queue to add them the library. Ipatible file formats are flagged, and will not be processed in the upload queue.
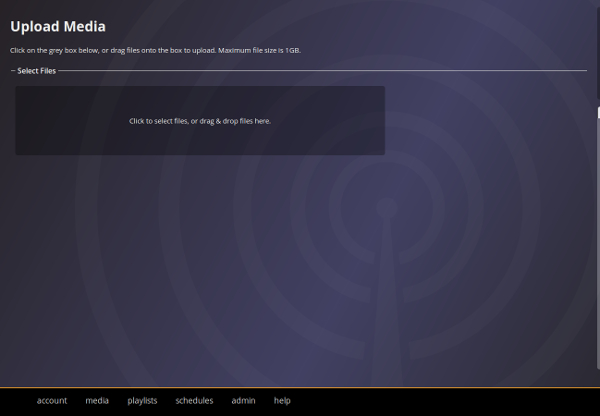
New Media may be added to the library using the media uploader, accessed from the media menu.
Drag and drop one or more media files to the uploader, or click within the shaded box to open a file selection window. Each file is uploaded in sequence, and added to a queue. Progress of the current upload is displayed alongside the filename.
Pro Tip Max Limit set to 1GB _(may be increased)
Select media from sidebar. Either click Edit or right click Edit Media info may be edited.
Batch Processing
Selecting multiple Media items (CTRL + Click, Click + Shift) and Click
Click Edit from media sidebar. Opens all selected media.
Use Copy All icon beside the field you wish to copy to all.
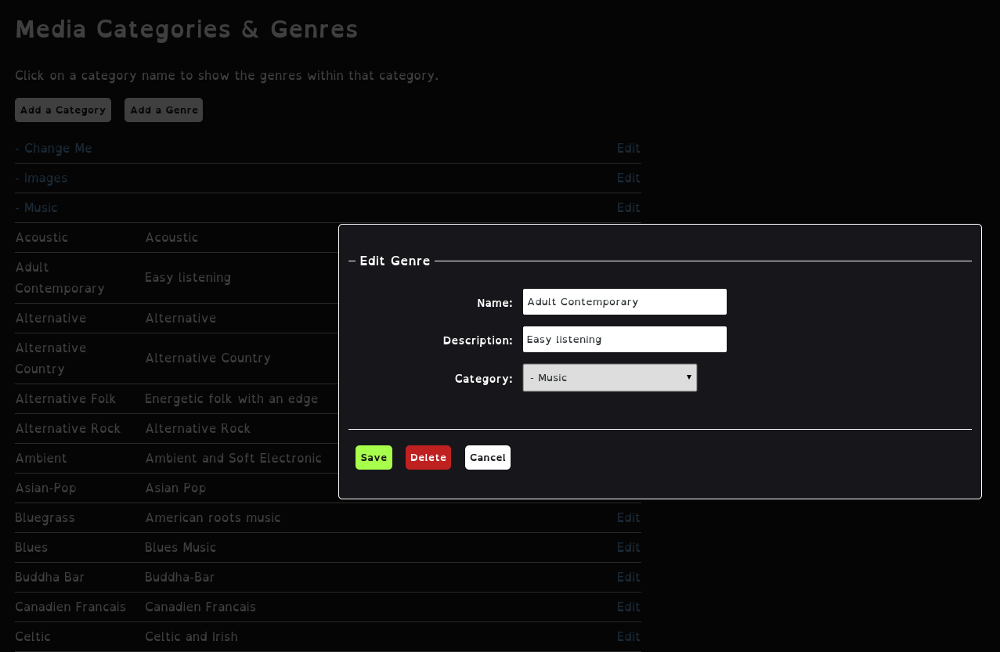
Create and edit unlimited categories and associated genres of media. e.g. Audio-Inuktitut, Images-Unicorns, Video-28mmPathe
Each Category and Genre can be specificied as default
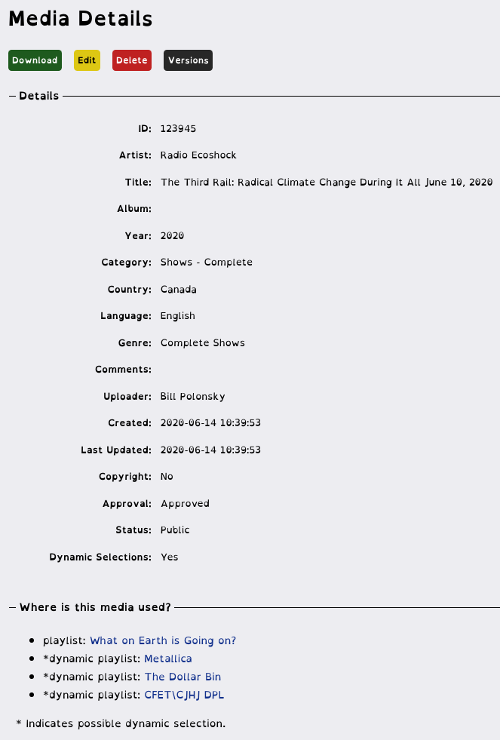
From the Media Sidebar, hightlight, right click (double click) and select Details to find out where the PL is used, who created it and when it was last modified.
Displays info This is where the
Who uploaded and when
Media ID can be found including usage of media
Where it is being used
Update media by adding a new version.

Use drop down menus to select applicable Language and Country
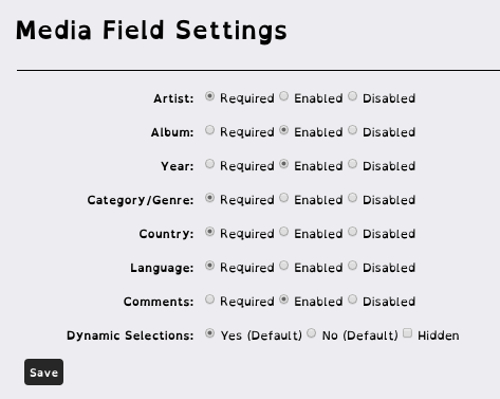
Default Settings and mandatory fields can be applied globally
Sidebar tabs used to search the media library or Playlist catalogue. Items are filtered to displayed only items to which the current user has permission, those which are marked as approved(ap), or further restricted to include only those media owned(my) by that user. With additional privileges, searches may also be conducted on archived(ar) or unapproved(un) media. Deleted media items go into a special directory called Archive. Authorized users are able to go into this archive, purge delete the actual media from the file system, or restore the media back to the library. The active filter is indicated by the use of uppercase notation (e.g. AP).
Simple search mode, users enter terms (i.e. a word or phrase) in the query window, application returns all media with title or artist containing those terms, or PlayLists with matching name/description. Click simple to clear or clear test and press enter
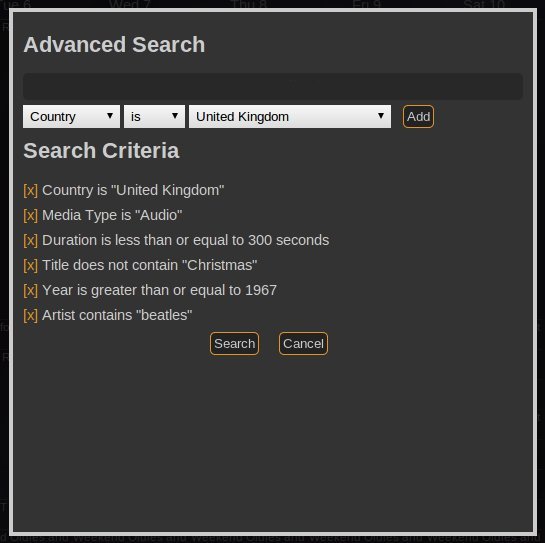
Advanced search mode, usersbine search criteria to query and filter large libraries. Query fields and search terms may be specified and added to a list of search criteria.
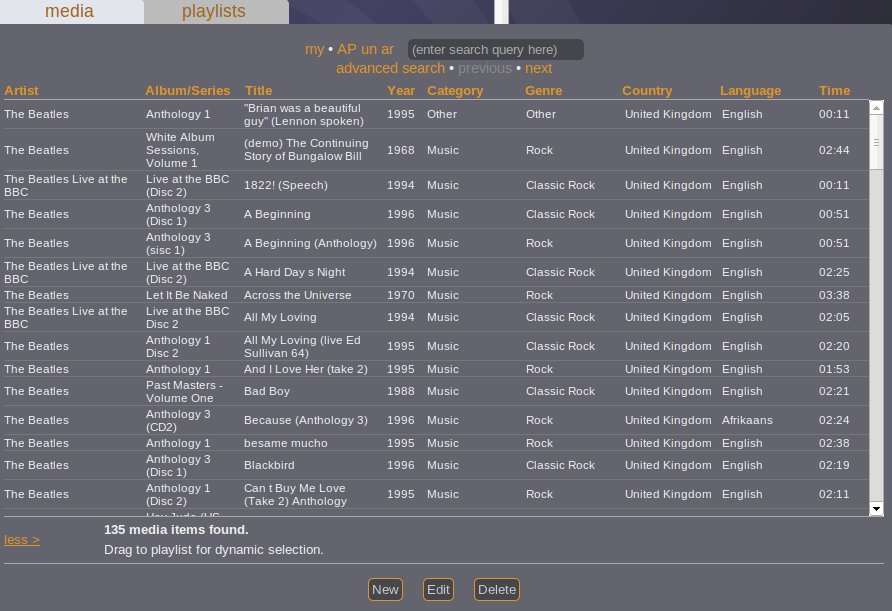
Once a search is conducted, items matching all listed criteria will be returned and the number of results is displayed at the bottom of the search tab. Further sorting or returns can be done by clicking on the headers of columns on the list to display in “Ascending\Descending” order. To clear the search results, clear the search window and press enter. Use the previous and next buttons to display the next page of results. The number of results to display per page may be set in the user profile settings. Select and reload previous search results using my searches.
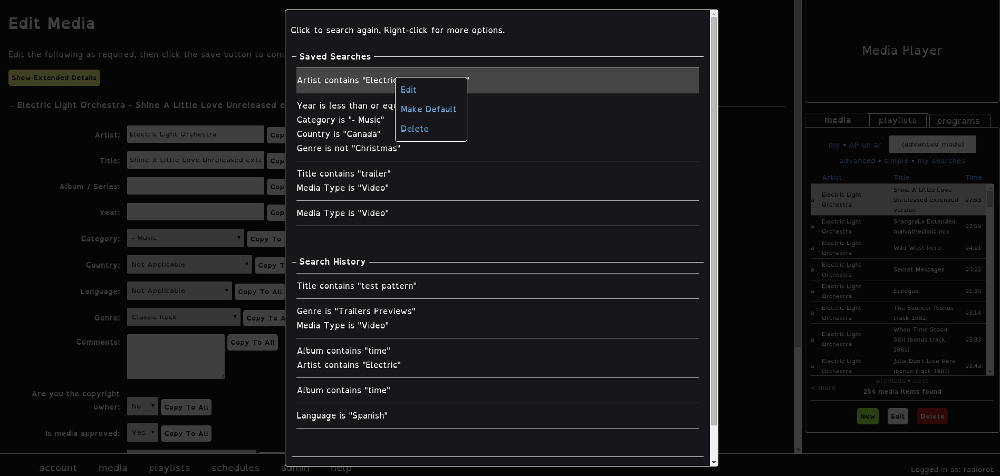
Search history results are recalled and used edited again for personalized results.
May be saved and one can be set as default. When a default search is set, results will be displayed when logging into your profile.
Pro Tip Remembers the last search result queries to be modified or save
A Playlist groups selections from the media library for scheduled or recurring broadcast and may contain individual media selections orbinations of media may bebined in PlayLists. Buttons along bottom Add Dynamic Selection and Station ID add functionality.
The MY button when selected filters to only show Play Lists created and managed by user.
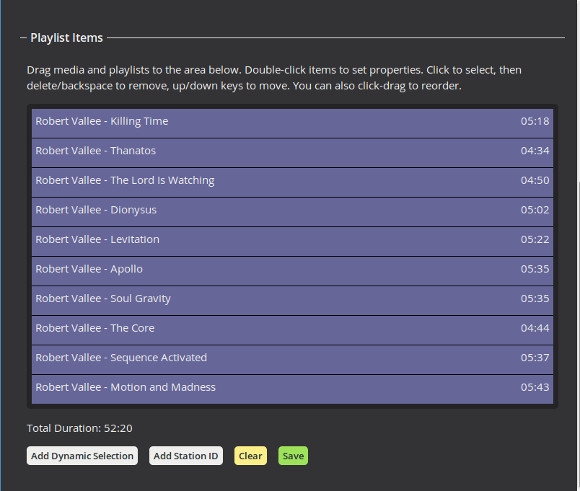
A basic Playlist that you can add media,dynamic segmentsandstation IDs Playlist(s) may be searched, saved and edited later.
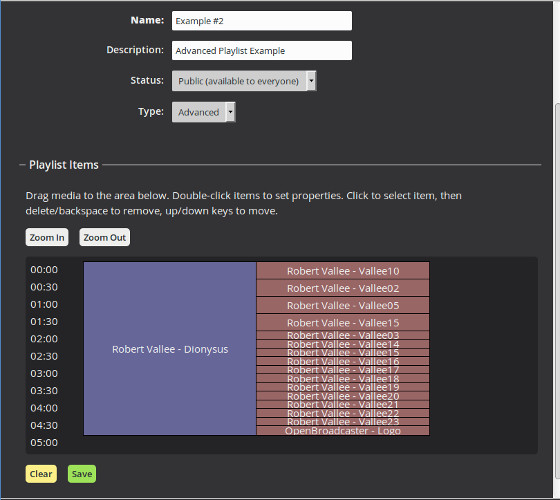
Mixes Image slide show with apanying Audio. Cuts into Video section. Audio and image data may be played simultaneously. Image media will be added to the list on the right of the Playlist items, audio tracks on the left. zoom in/zoom out on the schedule of Playlist items to increase the resolution of the time scale. To create an Advanced Playlist containing Dynamic Selections, first create a Standard Playlist containing Dynamic Selections, then add that Playlist to the Advanced Playlist.
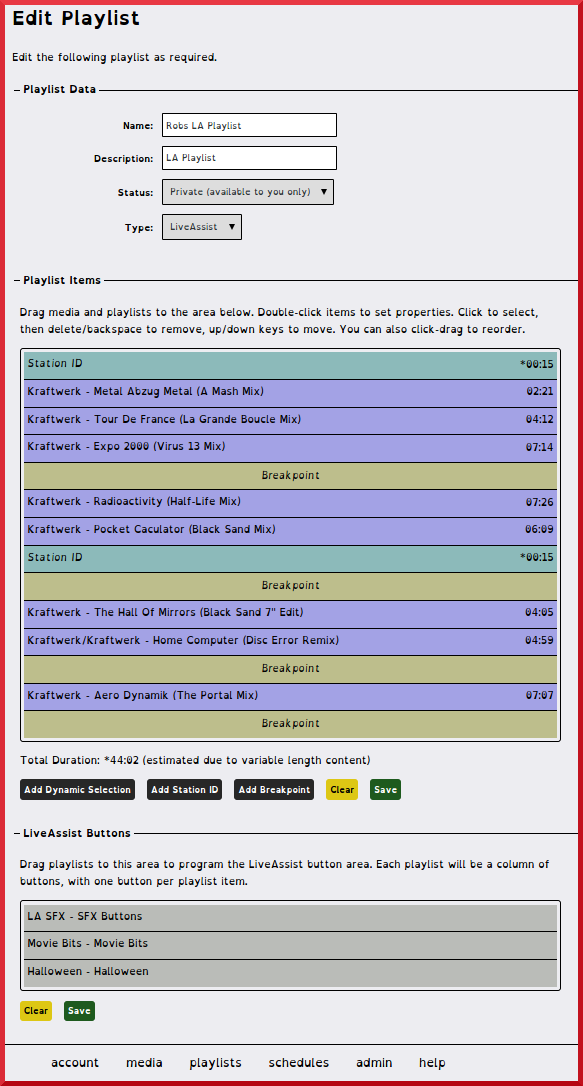
Used with LA Touch screen interface and hot button Player. Special Playlist that contains break points and button player. Accepts incoming live RTP Streams
Runs on a touch screen computer for LIVE Radio operation accepting incoming audio streams.
Using the playlist->new playlist menu option:
Name and Description for the Playlist so it can be easily identified.Status of public so other users can use your Playlist in their PlayLists and schedules (private PlayLists are only available to their owners).To Edit, Select Playlist and click Edit or right click, Edit
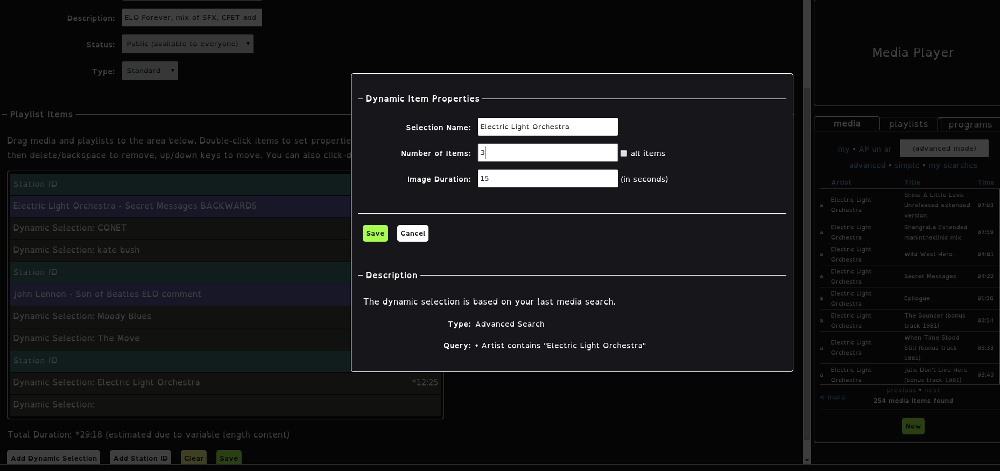
Plays a specified number of media as a segment. Once a dynamic section is setup, additional media items added later that match the search filters will automatically be included as items to play.
Use a search to generate dynamic selections for a specified time segment. eg. Filter media on the right to show The Beatles
Edit or create new Playlist.
At bottom of PL, click Add Dynamic Segments
Set number of Dynamic Selections to be drawn from the last search of the media library.
In image below we have set 3 items to play out of a search results of 254 items. Automatically estimates the time of this segment.
Station ID Button adds a special segment that automatically inserts Station IDs assigned to the specific player. This will play a Station ID into the Play List when it plays in a different station.
EG CFET Station IDs will play on CFET and the same Play List will play CJHJ Station IDs when it plays on CJHJ. Split Feed programming.
This Playlist is assigned to the Player to fill in when there is nothing scheduled.
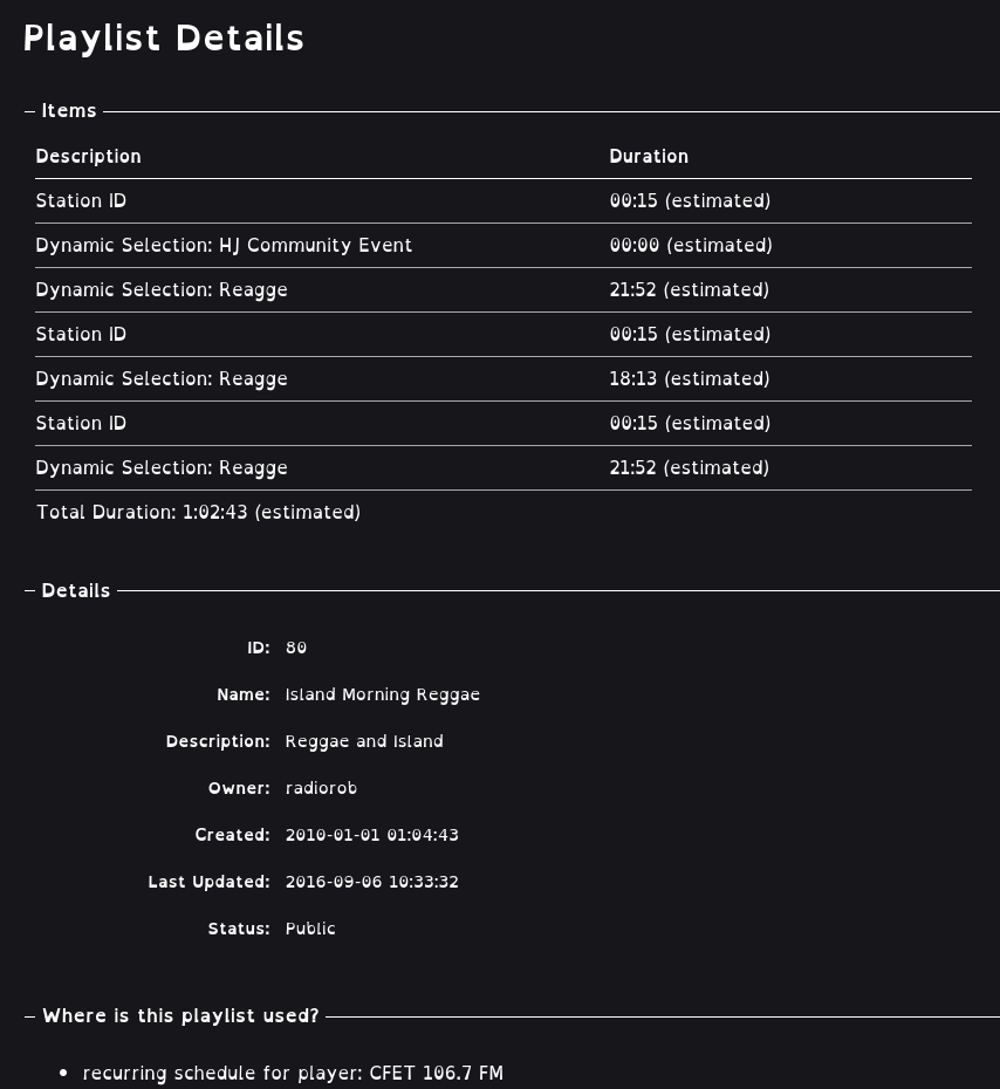
From the Playlist sidebar, right click and select Details to find out where the PL is used, who created it and when it was last modified.
Server schedule grid portrays a week of programming, with shaded, titled blocks indicating the content spanning those dedicated timeslots. Hover the cursor over a program block to view a summary of the scheduled show. Double-clicking a block accesses Show editor, if the current user’s permissions allow this.
Schedule a single piece of media or a Playlist (Show) or External Line IN Audio source.
Duration is automatically calculated for individual media tracks and estimated for dynamic segments.
DPL (Default Play List) assigned to that Player automatically starts to avoid dead air filling gaps with dynamic music segments. eg. 60 minute slot containing 50 minutes of programming, DPL will fill to top of the hour for next Time slot.
Flexible methods to schedule media and shows listed in ease of task.
Create and assign a DPL to player
Upload media. Drag to schedule and set to play in a time slot.
Select uploaded media and drag into an existing scheduled Playlist.
Note _CAP Emergency Alerts automatically override all schedules, currently playing media and internal Priority Announcements. _
The date/time of timeslots available for scheduling by any user are based on group permissions associated with that users profile. Permissions are managed by the Administrator group, although this may be delegated to another group. Only one Player may be scheduled at a time, although a Player may act as Parent to one or more players for scheduling. See Advanced Scheduling.
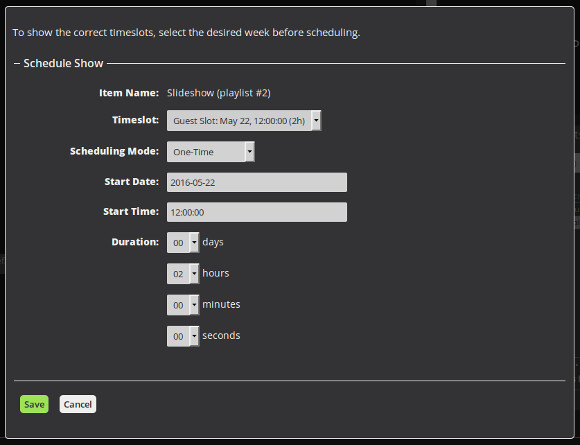
Open the schedule grid using the schedules->schedule shows menu option:
<Prev and Next> navigation aids.If the new show conflicts with any scheduled show, an error will be displayed and the new show will not be saved. Review the schedule. Look for an open time slot, advancing to the following week(s) if necessary.
Shows must be scheduled with adequate lead-time in order to be synchronized with a Player for broadcast. Allow at least 30 minutes lead time to ensure scheduled media can be uploaded to the Player before show time. Sufficient lead time is required to account for Show Lockout Time on the destination Player.
User with advance permissions can drag Media, Playlist or a Program and override basic users time-slots. If a slot is already scheduled, advanced user can remove or edit spots they are trying to program.
Advance users can have access to many options including, start and stop of time and date, duration. Scheduling Mode is available with options for daily, weekly, monthly as well as every x, day, week month
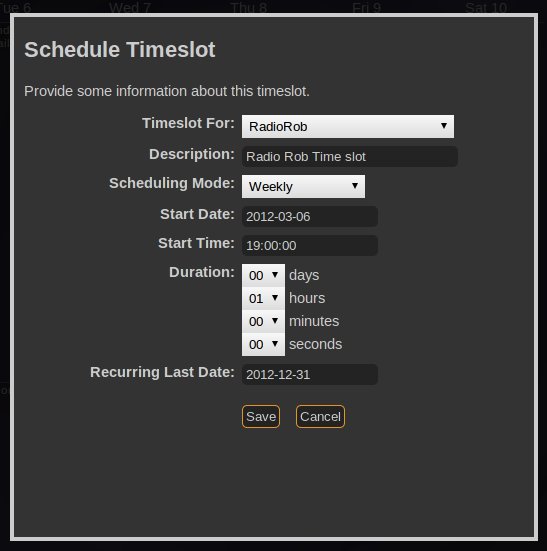
Create Time Slots and Assign Users
Double click on screen and a menu will pop up
Select user to assign from the drop down menu. This will display a list of all registered and active users.
Select the event mode; Single, Daily, Weekly, Monthly or every x, day, week or month
Select the start day (default is current date) and the time(s) when user can program a content time slot
Set duration. In this example the time-slot is one hour and it can be any duration. Time Slot cannot conflict with an existing time-slot.
In the event that a user is assigned a time-slot that is not utilized or does not contain any media or Play list containing media the DPL (Default Play List) assigned to that Player will automatically start to avoid dead air

Priority Announcements will start with minimal delay as specified in OBPlayer Dashboard how often to sync for priority messages. Priority Announcement function to play every N seconds. Set start and stop dates. Use sparingly. Only 1 Priority Announcement may run simultaneous per player. Selecting the default time of 00:00:00 for 3PM will start the broadcast immediately. In order to access this feature the user must have the required permissions and time must be authorized for the media to arrive at the Player in order to play.
Begin by selecting the Player where the Priority Announcement is to be scheduled. Drag and drop a single media from the media window. A menu will pop up asking for information.
Give the Priority Announcement a name.
Enter in the frequency of the broadcast in seconds
eg 600 sec = 5 minutes.
Enter in start/stop times and date range with pop up calendar
Click Save
When enabled in Player Manager a Line-In button appears in top right of scheduler. Drag Schedule Line-In onto schedule. What ever is plugged into the Line-in of local machine running OBPlayer will be passed through. Example source is a satellite audio receiver.
CAP Emergency messaging will over ride this source, play the announcement and resume normal programming.
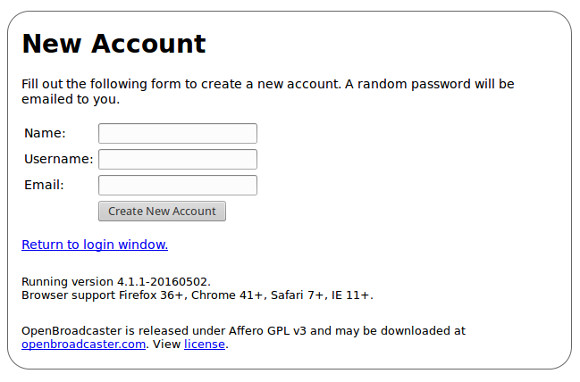
Users may create an account from a link on the Welcome page. This may also be disable if you do not want public to sign up for new accounts in User Admin.
Only one registration is allowed at any given email address. Users are notified of a new, random password by email, upon registration or when a password reminder is requested. Once a user has registered, a notice is sent to the Administrator . Until a user is assigned to a group, they are limited to read only browse/preview of the media library.
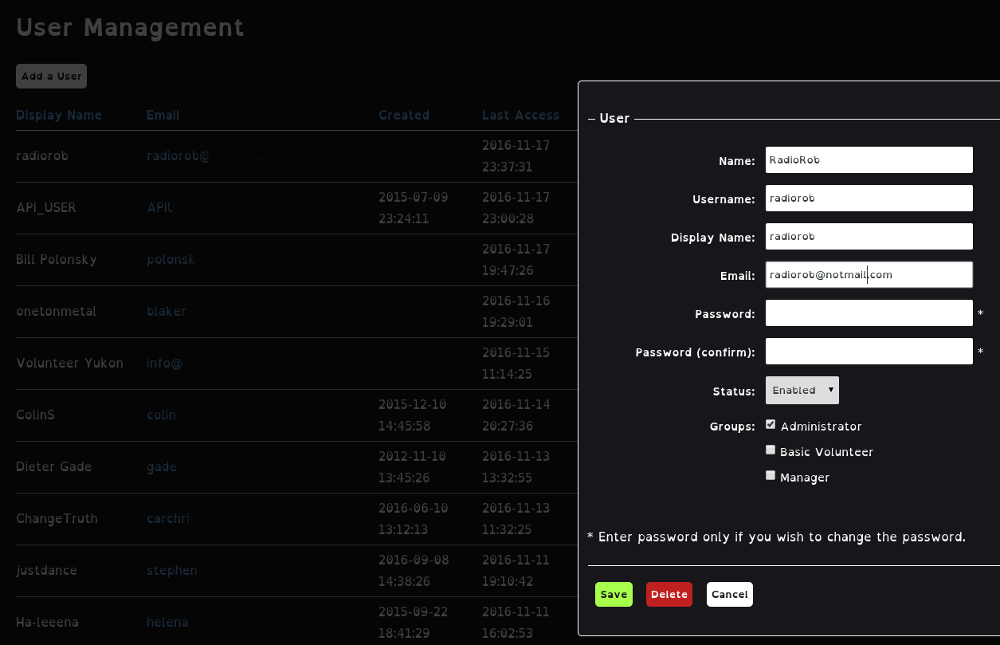
The admin user has access to all media, playlists and schedules. As new users are added, they are assigned to a group with the appropriate set of permissions. For example, a guest user may browse, but not add/edit/delete items in the media library.
Admin can disable new user sign up.
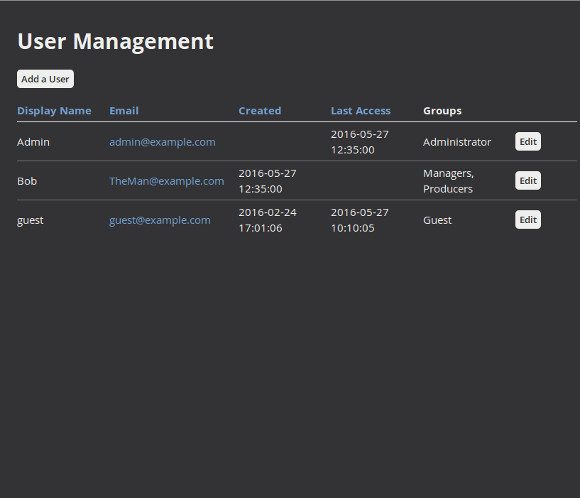
The user management menu provides a list of user accounts, indicating group membership and most recent access. Sort by name, last login and creation date.
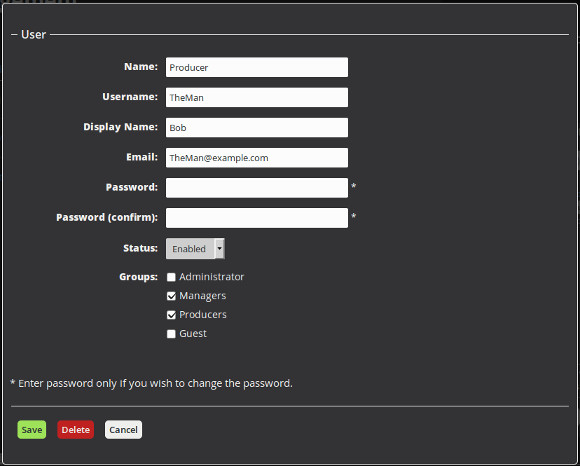
Add or Edit User account settings.
Change Display\User Name
Specify email address for reset and notifications
Assign user to permissions group(s)
Enable\Disable User Status
The permission menu accesses a grid for fine-grained control over access to media, Playlist and scheduling functions, on a Player by Player basis. Users in the Administrator group may assign or revoke permissions to other user groups. Additional groups may be created for granting users’ permission to upload and/or download media, schedule PlayLists, or view playlogs. For example, approval for media and allocation of time slots could be delegated to a group that grants permissions on only one Player device, and has no other administrative privileges. Advanced Admin functions establish hooks for remote Player connections.
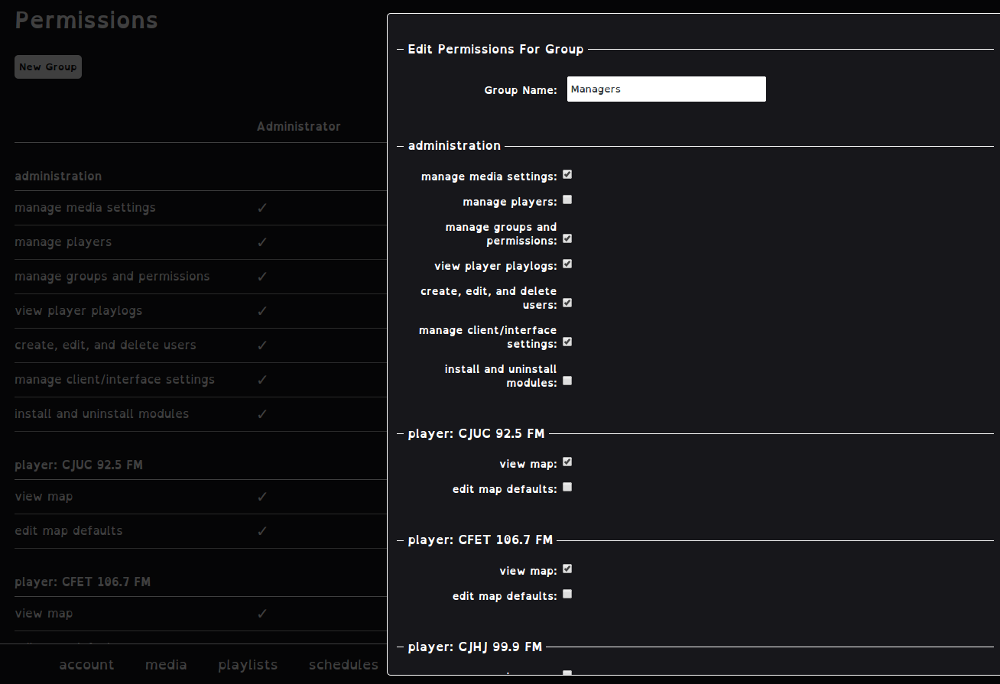
Name of new group
Select Tasks and Resources this group should have access.
Save
Players can be a physical playout device or virtual process located on the same hardware as the player or located in another location.
Note Leave IP address field empty
The Player ID is automatically generated and the assigned password will be needed when configuring the remote OBPlayer playout device. See Player Sync Settings
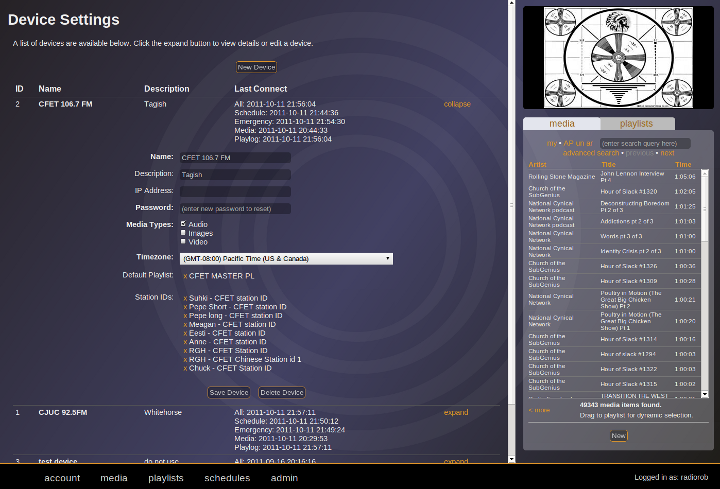
Connection Messages for Players connect back to the server at predetermined times as set in the Player dashboard. The “last Connect” info is continuously being updated and a graphic icon of a green check mark indicates that all connections are current and the device is in operation and communicating properly. Displays to right of newly created player showing times when last connected. Top line shows status of Priority, Media and Playlog sync last connections time to server. ”!” icon if there is no heartbeat.
Displays the Version of connected player, GPS Coordinates and Last known external IP
Pro Tip Connection info is also displayed with Station Icon status using Mapping Module
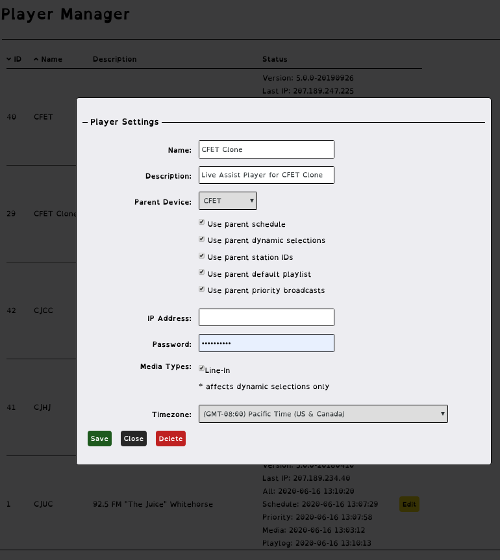
Share a common schedule among a network of players.
Customize the roles of each individual player, fine tuning Parent characteristics and controls.
-Schedules
-Dynamic Selections
-Station IDs
-Default Play Lists
-Priority Broadcasts
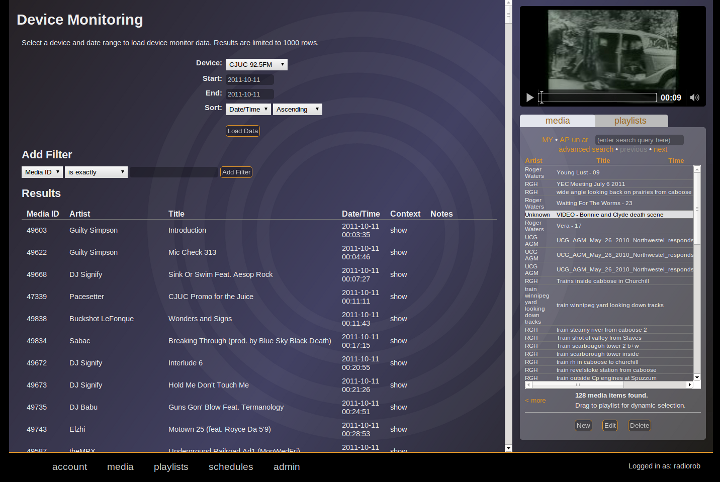
Play logs are generated from the Player and sent back to OBServer via TCP/IP according to the frequency specified in the Player Dashboard settings. Reports may be generated using filters for a combination of parameters including:
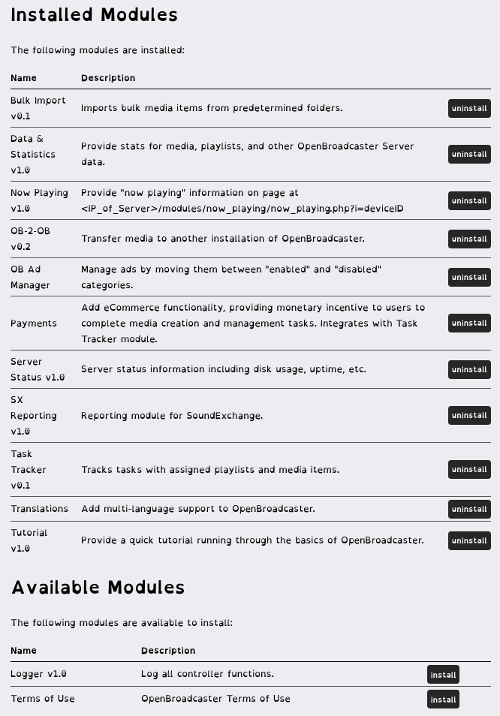
We include a couple of sample modules; Logger, Tutorial and Now Playing. There are dozens of modules avaible to provide added features and functionality.
Additional features may be introduced into the OB environment by third-party developers.
Check for updated list of Modules
Login Message of the Day and a default Welcome page displayed on the initial log in screen using an inline editor.
Find a bug? Want to request a feature? Submit your issue to OBServer or OBPlayer
Have some Gstreamer, PHP or Python coding skills? Help Contribute and Sponsor to make the OpenBroadcaster community even better
We really appreciate your feedback!